Before you start
- GameArter supports exports from Unity version 5.6 (Release date 31 Mar, 2017) and above.
Every GameArter SDK mode is designed for specific user-cases. Basic SDK is the most simple SDK designed for very simple games or developers who are not interested in implementing advanced features to their games.
- Continue only if you meet following points:
- The game does not contain user profiles.
- The game does not save any user data on server.
Estimated time of SDK implementation: 30 minutes. Please, follow the guide carefully, it will save you from many future problems. Many Unity functionalities must be made via SDK (outgoing links, fullscreen, and so on).
1. Getting started
At the very beginning, there is need to download and import SDK into the project.
Import + Basic Configuration
1.1. Create a project
Create new game project in projects section by pressing button "create a new project".
This is way you will get your project Id for inserting to GameArter SDK. Once you will make first configuration export (see further), you will get access to the system.
1.2. Download SDK package(s)
Download latest version of GameArter SDK Unity package from GameArter SDK Unity Package section.
GameArter SDK may need target-platform based SDKs for option to communicate with platform-based services like authentization, UIs and other services. Download all necessary SDKs on basis of all platforms you want to release your game on.
Web
Android
Google Play games plugin (Sign in service, Google Play Achievements and Leaderboards)
AdMob Ads by Google for Android
Play Services Resolver (conection with java (Android) libraries) - This library is part of AdMob library and thus it is not requred to import it into the project.
Take note that beside imported SDKs your Unity must be properly set and your PC must have installed necessary libraries for building games for Android. All related to Unity settings you can find on GameArter blog - section Android games.
NOTE: If you face an error of duplicated google libraries in your project, check "Plugin/Android" folder that contains all android libraries. You can remove whoel the folder and reimport both libraries (Google Play, AdMob) again. Then make a Force resolve request. After that, you probably will have to remove minSdk line from AndroidManifest.xml file. Finally, it shoudl work.
1.3. Import downloaded SDK package(s) (point 1.2) to the game project
Path: Assets → Import Package → Custom Package [HELP]
If your project contains current SDK, update changed files (except scripts you have adjusted (=GarterCallbacks) if possible).
Web
No more action required
Android
Run Android Resolver: "Assets → Play Services Resolver → Android Resolver → Resolve". If you have a problem with build, try resolve with option "Force Resolve (Assets → Play Services Resolver → Android Resolver → Force Resolve)"
1.4. Switching to target platform
GameArter SDK currently support builds for WebGL and Android.
Web
File → Build Settings → WebGL → press "Switch Platform button" [HELP]
Android
File → Build Settings → Android → press "Switch Platform button"
If you do not have preferred platform in build options, be sure you have it installed.
1.5. Fixing possible errors
- Duplicity of Newtonsoft.Json library | More newtonsoft.json libraries is available in the project. Solution: Let one active and remove / deactivate all remaining. Usually, this occures when you have Photon sdk in your project. Photon uses newtonsoft for some operations in the editor. You can fix duplicity by unchecking option "Editor" in Assets/Photon Unity Networking/Editor/Newtonsoft.Json.
Missing plugin | Check what platforms are selected in plugins setting. [HELP] - You should place no SDK scripts to hiearchy manually. All scripts are loaded automatically. If you insert some there, SDK will not work properly.
Missing Prefab | Some OS do not load prefabs to example scenes. In such case you see GameObjects "Missing prefab".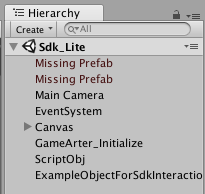
The prefabs are not necessary for right function of the SDK, however, there is recommended to add them to the example scenes manually to see the benefit of using them. These prefabs ara available at Assets/GameArter/Prefabs folder. Drop prefabs GameArter_Features and GameArter_DashBoard and move them into scene's hiearchy window.- Info about missing prefabs in Hiearchy window inside example projects. There may happen during Unity upgdares, that there is lost link to a prefab. If this happen, simply go to GameArter/Prefabs folder and move prefabs GameArter_DashBoard and GameArter_Features back to hiearchy. In a case that also GameArter_Initialize object is reseted (projectId = 0), there is better to reimport SDK to the project again to see example scenes in functional state.
- Need a help?GameArter Slack: @adm_vladimir / email - [email protected] /
2. SDK configuration
At the very beginning, there is need to download and import SDK into the project.
Follow the guide:
- Open first scene of your project
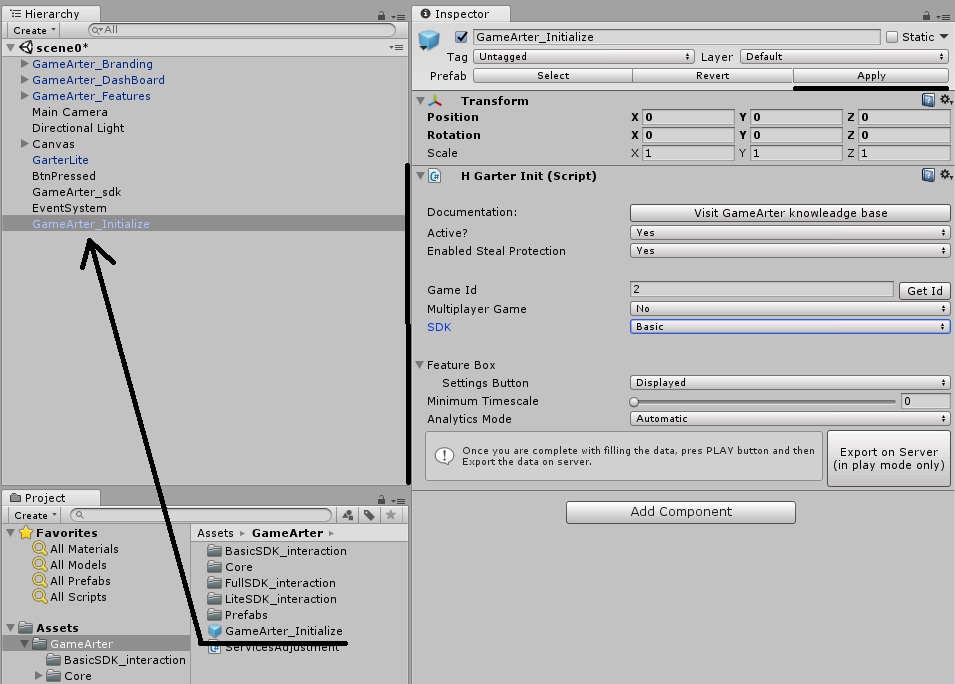
- Select preferred way of adding "GameArter_Initialize" object
- Option 1 - prefab
- Find "Assets/GameArter/GameArter_Initialize prefab"
- Move the prefab (or create an equivalent object containing HGarterInit.cs script) to Hiearchy window
- Option 2 - own object
- Create new Empty Object (GameObject → Create Empty) and named it ">GameArter_Initialize"
- Find script "Assets/GameArter/Core/_scripts/HGarterInit.cs" and move it into "GameArter_Initialize" object
- Option 1 - prefab
- Select "GameArter_Initialize" object in hiearchy of your project
- Fill all options on a basis of documentation below. If you use older unity versions and selected 1st option of adding GameArter:Initialize (via prefab), do not forget save your changes made in the prefab by pressing "Apply" button.
-
1
Documentation
A button opening knowledge base you are currently on. -
2
Active?
A switcher via which you can enable / disable run of the sdk. -
3
Enable theft protection
Turns off game protection for test purposes. With active protection, the game runs on http://localhost + gamearter and pacogames domain. There is not a possibility to open the game via firefox on address file:// ... -
4
Project ID
Every game must have its unique project ID. Project ID is a signature of the game with which it accesses, the game has access to GameaArter features. You got your project Id during creatng the game project. -
5
Multiplayer game
Select, whether your game contains multiplayer mode (can be played as network multiplayer)
If yes, select, whether the game will use GameArter Photon ID or your own. Cost of GameArter Photon ID is 10% of income share. -
6
SDK
The mode, under which the SDK will run. Select Basic. -
7
Feature Box
Feature box is a prefab which you can insert into a scene. The box contains quick buttons for opening GameArter features. Most of them is not available in Basic mode. Available buttons are: "Share" and "Settings". "Share" is displayed automatically, presence of "Settings" button is optional. If you enable it, when a user press the button, you will receive a callback on its basis and your own settings screen will be opened.en. -
8
Minimum timescale
When an ad is being displayed, SDK will automatically set minimum timestamp to keep low requirements for performance. Set this to 0 if your game is not sensitive for this timescale value. Recommended value for games using networking (multiplayer): 1. -
9
Analytics mode
Analytics mode selection. Analytics may run under three modes. Find out more about individual options at: ... and select the right for your purpose.- Automatic | SDK automatically detects scene changes and sends them to analytics. Beside this automatic mechanism, you can sending also own events.
- Manual | Only your own requests go to analytics.
- OFF | No in-game data are in analytics. Analytics displayes only standard data.
-
10
Save the configuration.
- 1) Save the filled data to prefab by pressing "Apply" button
- 2) Press "play" button in the editor (Play mode) and export the configuration to server by pressing Export on server button.
-
11
Ad Units configuration
All in-app ad units must be defined for their proper settings, running and tracking. There is no limit for number of defined ad units - define ad units and their types on basis of your needs.
Section: Platform App Id:Section: Ad Units:Web
This column is ignored. Section is designed for settings App Id for Android and iOS builds only.
Android
Android App Id - App id of an account under which Ads will be displayed. You can either use own AdMob account and get the app id there, or you can get and use GameArter App Id. This step is not automatized yet. For getting GameArter Android App Id, send a requst at [email protected].
- Size: Number of defined ad units in teh game
- id: unique ad unitId. E.g. "FullscreenAdOnEndScreen"
- Ad type: Type of the ad - fullscreen / rewarded / banner
- Ad Mob Android Channel: If you use GameArter app Id for ads, let it free. Otherwise create an ad unit of selected type in your AdMob account and place here its channel Id.
- Ad Mob iOS Channel: If you use GameArter app Id for ads, let it free. Otherwise create an ad unit of selected type in your AdMob account and place here its channel Id.
- Max Ad Frequency Seconds: - minimum time between 2 displayed ads in seconds. E.g 120 = 2 minutes. All requests for the ad in less than 2 minutes from previous displayed this ad will be ignored
2.1. Exporting game configuration
By export described in previous point 2/10 (save the configuration) you sent game configuration to GameArter system. The game will run under the exported configuration. If you make a change in the GameARter_Initialize object, you must to make re-export.
Export is visible in project panel.

- Rows / Buttons explanation:
- Version | exported project version (filled in Garter_Initialize object inside unity)
- Version State | project mode - testnet / production
- Interpreter | interpreter under which the project version runs
- Config status | Status of data state - concept / pending (= waiting for authorization by admins) / live (= in production)
- Files upload button | Opens environment for uploading game files
- Test the game button | Opens game in a new tab
- Remove button | Removes project version
3. Working with SDK
Initialization of SDK is automatical from GameArter_Initialize object.
SDK in version 1.3 and above
Once SDK is initialized, it informs about this event by calling delegate event "SdkInitialized". In addition to "SdkInitialized", Basic SDK contains "SettingsButtonPressed" event yet. Listeners for these events must be added in the same scene as "GameArter_Initialize" object is inserted.
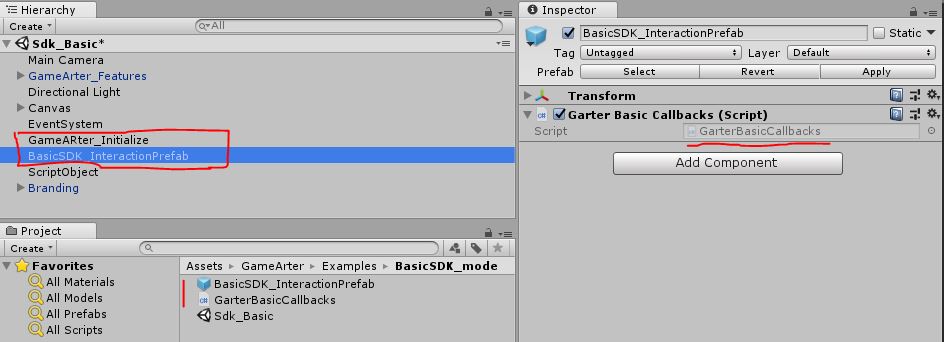
In fact, you can replicate function and prefab inserted in "Assets/GameArter/Examples/BasicSDK_mode" or use directly the example mlements.
There is need to move them to Hiearchy of same scene as GameArter_Initialize object
Showcase of GarterBasicCallbacks.cs
using System.Collections;
using System.Collections.Generic;
using UnityEngine;

public class GarterBasicCallbacks : MonoBehaviour {

	void Awake(){
		// ADD LISTENERS FOR EXTERNAL EVENTS
		Garter.I.AddExternalCbListener< GarterWWW >(Garter.ExternalListener.SdkInitialized, SdkInitialized);
		Garter.I.AddExternalCbListener< string >(Garter.ExternalListener.ExternalSettingsButtonPressed, SettingsButtonPressed);
		Garter.I.AddExternalCbListener< string >(Garter.ExternalListener.PossibleGameExit, PossibleGameExit);
		Garter.I.AddExternalCbListener< string >(Garter.ExternalListener.PWAState, ProgressiveWebAppState);

		// Dont destroy on load - variables and functions will be available in every scene
		DontDestroyOnLoad(transform.gameObject);
	}

	private void SdkInitialized(GarterWWW data){
		Debug.Log ("SDK initialized - Garter calls are available.");
		// set user data (nickname etc) and load game
	}

	private void SettingsButtonPressed(string emptyString = null){
		Debug.Log ("GARTER CALLBACK - open settings");
		// Called on pressing "Settings" button inserted in "GameArter_Features" prefab
		// visibility of this button is customizable via GameArter_Initialize
	}

	private void ProgressiveWebAppState(string state){
		// Install as app button visibility (See point 3.11).
		Debug.Log ("Progressive Web App State: "+state);
		if (state == "enabled") {
			// display button "install as app"
			buttonInstallAsApp.SetActive(true);
		} else if(state == "disabled"){
			// hide button "install as app"
			buttonInstallAsApp.SetActive(false);
		}
	}
}
SDK in version lower 1.3
Once SDK is initialized and all data and features available, SDK informs about it by calling SdkInitialized() function located in the class GarterBasicCallbacks (Assets/GameArter/BasicSDK_interaction/GarterBasicCallbacks.cs).
Once SDK is initialized, you can ask for SDK data. See the example below.
public class GarterBasicCallbacks : MonoBehaviour {

	public void SdkInitialized(){
		Debug.Log ("SDK Initialized - all user's data and SDk features available");
		Debug.Log ("UserNick: " + Garter.I.UserNick());
		Debug.Log ("UserLanguage: " + Garter.I.UserLang());
		//... see point 3.4 for more options
	}

}
3.1. General info
On SDK initialized state, you can start any interaction with SDK.
-
1
User data
GameArter has implemented auto-login and auto-authentication system. There is always returned a user identity even when a game does not use login system.
copystring userNick = Garter.I.UserNick(); // user's nickname string userLang = Garter.I.UserLang(); // default language a user has set on pacogames // ar, cs, de, en, es, fr, pl, pt, ru, tr string userCountry = Garter.I.UserCountry(); // country shortcut the user is connected from bool loggedUser = Garter.I.IsLoggedUser(); // returns true, if user is logged in Texture2d userImage = Garter.I.UserImage (); // returns user's profile img as a texture -
2
Browser name
WebGL games have often different performance in various browsers. With knowledge of a browser a game is running in, there is a possibility for optimization of disabling features for certain browsers. E.g. car destructions for Chrome.
string browserName = Garter.I.GetBrowserName();
3.2. Ads
Ad types
- Interstitial ads = fullscreen ads (Available on Web, Android)
- Rewarded ads = interstitial ads with a reward for watching (Available on Web, Android)
- Banner ads = ad banner unit in certain place on the screen (Available on Android)
Ad types can be combined in a game (One game can use all 3 types of ads)
Fullscreen (Interstitial) ad
Request:
Garter.I.RequestAd(adUnitId, (optional)callback);
Rules for displaying Interstitial ads
- Request ads only in suitable places. Ads cannot affect best user experience (UX) from playing games
- Request ads in any suitable place for ad
- Game sounds MUST be muted during an ad
- Any exhortation or rewards for interacting with ads is prohibited
Best practices for interstitial ads
- First ad call from the start of the game. An ad at the beginning of the game does most of the income (the highest number of views). GameArter ad manager works with 2 types of preroll ads. In a case, that a website does not have own preroll, GameArter ad manager displayes an preroll ad on a load of gameplayer. In such case, first ad call from game is ignored. If no preroll on load of gameplayer is displayed (because it is not possible or is disabled), an ad on first ad call is displayed (= replacement of the preroll ad). From that reason, insert first ad call always at the beginning of the game.
- Call ads in every suitable place. GameArter's ad manager contains a layer which filtrates ad requests to achieve the best ratio between number of displayed ads and user experience.
How ad requests work
- ad request is received in GameArter Ad manager.
- GameArter Ad manager checks availability of ads and processes ad-frequency-check.
- If suitable ad was found, GameArter Ads manager displayes an ad.
Adblock ads behaviour
In a case of active ad blocking in user's browser, GameArter runs affiliate ads instead of classic ads.
Ad configuration for individual websites
Ad configuration for individual websites where the game is published is visible in Reports section after release of the game. There you can find out preroll ad type, frequency of ads, maximum length of ads, ad providers and so on. GameArter uses a mix of ad providers including own ads due to cover all websites restrictions (mainly policies for displaying Google Ads and ads.txt standard) and for achieving the best possible CPM. If you would like to make a change in default settings for a certain website or your game, contact GameArter support.
Implementation
Ads can be implemented either with or without callback, preferred way is up to a developer
- With callback - SDK provides callback about current state of an ad
- Without callback - SDK manages game behaviour during ads automatically based on configuration in "ServicesAdjustments.cs file" file.
Implementation without a callback
If no callback in ad request is found, GameArter mutes a game (on displayed ad) and unmutes (on completed ad) game automatically. This behaviour is set and may be adjusted (if default solution does not work properly in the game) via ServicesAdjustments.cs file (mentioned below).
public class AdCallExample : MonoBehaviour {
	Garter.I.RequestAd (adUnitId); // request an ad.
}
Where adUnitId is unit id defined in step 2.1.12 - ads definition
Issues prevention
- Do not call ads in a time game sounds is being initialized. If you do not want adjust ad configuration for muting / unmuting game in ServicesAdjustments.cs, be sure you do not call ads before or during a time when game sounds is being initialized. If any sound loads after the ad request, ad manager is not able to mute it. In this case, ad implementation is not valid. Always verify in the editor, that all sounds are muted during a box illustrating an ad.
Configuration of game behaviour during ads
Adjust it only if it does not work in your game (something is wrong while you see UI "Ad is being displayed"), or you can improve it. Make the change inside Assets/GameArter/ServicesAdjustment.cs. On end of an ad, function "AdClosed()" (located in the same class) returns the game back to the state before changes made by "AdOpened()" (CacheCurrentSettings ();). If you adjust function AdOpened(), you must adjust function "AdClosed()" as well.
SDK works with sound, timescale and pointer by following way:
// ServicesAdjustments.cs file
public void AdOpened(){
	CacheCurrentSettings (); // cache current state - game will be returned to this state after clossing an ad (=mute game)
	// mute the game sound
	AudioListener.volume = 0f;
	//set minimum timescale to improve ad performance
	float minimumTimeScale = Garter.I.GetMinimumTimeScale ();
	Time.timeScale = minimumTimeScale;
	if (minimumTimeScale == 0) {
		AudioListener.pause = true;
	}
	// display mouse pointer (unlock cursor)
	if (Cursor.lockState != CursorLockMode.None) {
		Cursor.lockState = CursorLockMode.None;
	}
	if (!Cursor.visible) {
		Cursor.visible = true;
	}
}
Implementation with a callback
If a developer prefer setting game behaviour during ads on his own, he can deal with it via used callback function.
Callback states
- ignored = ad request has been ignored. Probably due to not enough interval from the previous interstitial ad
- pending = GameArter is checking availability of an ad
- loaded = An ad has been loaded. Game sounts must be muted
- running = An ad is running
- completed = An ad has been completed Game sounts must be unmuted
- failed = something went wrong Game sounts must be unmuted
public class AdCallExample : MonoBehaviour {
	Garter.I.RequestAd (adUnitId, (state) => {
		if(state == "loaded"){
			// MUTE GAME
		} else if(state == "completed" || state == "failed"){
			// UNMUTE GAME
		} else {
			// ... do nothing
		}
	});
}
where adUnitId is unit id defined in step 2.1.12 - ads definition. Be sure that game behaviour is in accordance with the terms for displaying ads.
----------------------------Note (if you need...)
Ads may be set differently or updated dynamically for every website / platform. Especially minimum time interval for displaying ads. This value, together with minimum time to next ad (both in seconds) you can get from SDK by the way mentioned below. Possible use case is e.g. for setting own ads in a loop.
public class AdCallExample : MonoBehaviour {
	Garter.I.GetAdConf ((conf) => {
		SdkDebugger("Garter.I.GetAdConf ((conf) => {})", ("Next ad in "+conf.nextAdM.ToString()+"s. Minimum time between ads "+conf.meantimeM.ToString()+"s."), "returns ads configuration.");
			});
}
Note, that getting ad configuration must be tested. On basis of internal tests, unity does not return callback function of this type immediatelly, but after a user interaction (click) -> (Unity gets focus). This says, that working with Garter.I.GetAdConf() may be very hard e.g. in driving games where users do not do any clicks during gameplay.
Rewarded ad
Availability of a rewarded ad is individual based on user's behaviour. Display button / option to launch rewarded ad only if the rewarded ad is available.
Rewarded ad can be called only with defined callback function
Callback states
- ignored = ad request has been ignored. Probably due to no ad (be sure you check ad availability before requests!)
- pending = GameArter is processing the request
- loaded = Rewarded ad has been loaded. Game sounts must be muted
- running = The ad is running
- completed = An ad has been succesfully completed. Release reward + unmute sounds
- failed = something went wrong - user canceled the ad unmute sounds without reward
Implementation
public class AdCallExample : MonoBehaviour {

	if(Garter.I.RewardedAdAvailability()){
		// display button / UI for requesting rewarded ad
	}

	// On rewarded ad request from user (e.g. pressing rewarded ad button)
	Garter.I.RequestAd(adUnitId, (state) =>
   {
	    if(state == "loaded"){
			// MUTE GAME
		} else if(state == "completed"){
			// UNMUTE GAME, RELEASE REWARD
			// HIDE BUTTON FOR REWARDED AD
		} else if(state == "failed"){
			// UNMUTE GAME
			// HIDE BUTTON FOR REWARDED AD
		} else {
			// ... do nothing
		}
	});
}
where adUnitId is unit id defined in step 2.1.12 - ads definition. Be sure that game behaviour is in accordance with the terms for displaying ads.
Note: rewarded ad availability is driven by ad network. Because editor is not connected with any ad network, returned rewarded ad availability state is always false.
Banner ad
where adUnitId is unit id defined in step 2.1.12 - ads definition
3.3. Analytics
You can use any tool for tracking you want. Do not you know any? Here's example of few of them.
By default, GameArter has implemented and supports Google Analytics for websites with a bridge of caching game-side data events. All you need to do to activate it, is to insert your own Google Analytics tracking id to "Basic settings" tab of your project. This analytics tracks all gameplayer-based data as players, source of visits, time of playing and so on. These data can be extended by data in a form of events sent from a game, see Google analytics guide page. Some basic events as scene change and so on can be send to analytics automatically on basis of analytics configuration made in point "Game side SDK configuration".
Send any information you want to analytics by call:
Garter.I.AnalyticsEvent(string action, string category, string label, int value);

/*
where:
category, label, value are optional parameters
See more at: https://developers.google.com/analytics/devguides/collection/analyticsjs/events
*/
3.4. Network ID
If your game is multiplayer, using GameArter Photon subscription, you need to insert following SDK calls to PhotonSDK to places designed for inserting Photon ID and Photon Version. Load the data via the calls directly into Photon scripts.
Garter.I.GetMultiplayerNetwork () [0]; // photon Id
Garter.I.GetMultiplayerNetwork () [1]; // photon ver
Server Authentication
For possibility to connect to photon, you must authenticate the game. This will be done by PhotonNetwork.AuthValues.AuthType = CustomAuthenticationType.Custom;. See the example below.
Users identification in photon
Photon works with general UTF formats. By this way, unique nicknames at the beginning may become a non unique nickanames after removing some special signs. Eg. nickname "I♥GameArter" == "IGameArter" after photon compilation. Similar with chinesse signs. If 2 players with same nickname are in the same room, it will cause a problem. From that reason, SDK offers a special unique id identificator you can use for identifying players in a photon (instead of using nicknames for that). See more info.. Call Garter.I.NetworkUniqueUserId () for getting an unique identificator.
Photon Authentication example
PUN 2
For Photon's example of connection to network, check Photon's script ConnectAndJoinRandom.cs. This class connects to network via "ConnectNow" function.
For usage with GameArter, we will have to modify and move this function into our script (this is example, you do not need to use the photon's function).
How to connect to Photon PUN2
- you must disabled auto connection of the photon, if you used their example file ConnectAndJoinRandom. This can be done by removing content of "ConnectNow" function
- for removing alert message of no filled AppId, fill AppIdRealtime of PhotonServerSettings plugin by some fake id - e.g. space " ".
- Wait till gamearter SDK is initialized (see point 3 - Working with SDK)
From this moment there is known App Id and version for your application. Once needed, you can connect to photon network by following way:- Inside script you want to connect to photon, link Photon libraries
copy
using Photon.Pun; using Photon.Realtime; -
Create a function for connecting photon
copy
private void ConnectPhotonNow(){
        // set user data (nickname etc) and load game
        // Server authentication
        PhotonNetwork.AuthValues = new AuthenticationValues();
        PhotonNetwork.AuthValues.AuthType = CustomAuthenticationType.Custom;
        PhotonNetwork.AuthValues.AddAuthParameter("u", Garter.I.NetworkAuthentication());
        PhotonNetwork.AuthValues.AddAuthParameter("g", Garter.I.GameId().ToString());

        // Set unique userId for photon
        PhotonNetwork.AuthValues.UserId = Garter.I.NetworkUniqueUserId();

        // Set dynamic photonID - (must! be set for possibility to switch from test to production mode on release)
        Debug.Log("PhotonId: " + Garter.I.GetMultiplayerNetwork()[0]);
        PhotonNetwork.PhotonServerSettings.AppSettings.AppIdRealtime = Garter.I.GetMultiplayerNetwork()[0];

        Debug.Log("SetId: "+PhotonNetwork.PhotonServerSettings.AppSettings.AppIdRealtime);


        // Connecting photon with right game version
        string photonGameVersion = Garter.I.GetMultiplayerNetwork()[1];
        PhotonNetwork.ConnectUsingSettings();
        PhotonNetwork.GameVersion = photonGameVersion + "." + SceneManagerHelper.ActiveSceneBuildIndex;
    }
- Inside script you want to connect to photon, link Photon libraries
PUN 1
// Server authentication
PhotonNetwork.AuthValues = new AuthenticationValues ();
PhotonNetwork.AuthValues.AuthType = CustomAuthenticationType.Custom;
PhotonNetwork.AuthValues.AddAuthParameter("u", Garter.I.NetworkAuthentication());
PhotonNetwork.AuthValues.AddAuthParameter("g", Garter.I.GameId().ToString());

// Set unique userId for photon
PhotonNetwork.AuthValues.UserId = Garter.I.NetworkUniqueUserId();

// Set dynamic photonID - (must! be set for possibility to switch from test to production mode on release)
// Photon Pun 1 and 2 has different API and this api.
// Photon Pun 1
PhotonNetwork.PhotonServerSettings.AppID = Garter.I.GetMultiplayerNetwork () [0];
// Photon Pun 2
PhotonNetwork.PhotonServerSettings.AppID = Garter.I.GetMultiplayerNetwork () [0];


// Connecting photon with right game version
string photonGameVersion = Garter.I.GetMultiplayerNetwork () [1];
PhotonNetwork.ConnectUsingSettings(photonGameVersion + "." + SceneManagerHelper.ActiveSceneBuildIndex);
3.5. Individual game mode
There's a possibility you require to run the game in individual game modes on certain websites or e.g. for testing. By using individual game mode features, you can set individual mode the game will run in for every website the game is published on. SDK will return you after its initialization number of modes which you will assign to a certain website. Then, you can simply set data with which the game should run according the mode number.
Get mode number under which the game should run:
byte individualGameModeNumber = Garter.I.IndividualGameMode();
3.6. Fullscreen
Because of other services around a game, fullscreen mode must be called over GameArterSDK. Attach following call to fullscreen button in your game (if your game has such button). If a game is already in fullscreen mode, fullscreen is cancelled by the call.
Garter.I.Fullcreen();
Fullscreen must be initialized on Pointer down event.(Event trigger).
3.7. Redirects / Branding
SDK contains a solution for working with brands and making redirects (opening new tabs / windows). Branding and redirects must be made via SDK for two reasons:
-
Displaying right brand
SDK contains a multi-brand solution. In short, this feature allows to display all in-game logos on basis of a website the game is displayed on. Changes of outgoing links are also included. This feature is active for websites which promote games from GameArter system. With gameater promotion, there should be more gameplayes and higher incomes. Logos are downloaded at the beginning of the game.
-
Opening pages from a game
A browser pop-up blocker blocks all requests which are not initialized in a certain time from user's action. This applies for all JavaScript requests called from games. SDK contains a solution, which reduces the time between clicks and opens new tabs without hit of the pop-up blocker.
-
Tracking redirects
With our solution you will know about every made redirect. - From what logo, on what website, and how oftenly is being used.
2 Ways of implementation:
- Implementation via prefab
Prefab Individual_logo in Prefabs folder (Assets/GameArter/Prefabs) - A solution for placing own logos containing redirect links into your game. Option Individual requires placing own 2d texture as a button image and a link the logo will redirect. All redirects are opened as a new tab. 1) this does not destroy user's experience and 2) sites like app store or google play do not support opening in iframes.
If you want to have more individual logos in the scene, simply duplicate the object and change logos and links.
- Implementation via code:
Use function Garter.I.OpenWebPage (string targetURL);
This callmust be initialized on POINTER DOWN event. You can listen for this event via EVENT TRIGGER or via following code:copy// where gameObject is your target object for listening EventTrigger et = gameObject.AddComponent< EventTrigger > (); EventTrigger.Entry entry = new EventTrigger.Entry (); entry.eventID = EventTriggerType.PointerDown; entry.callback.AddListener((data) => { OnPointerDownDelegate((PointerEventData)data); }); et.triggers.Add(entry);
3.8. SDK Loading screen
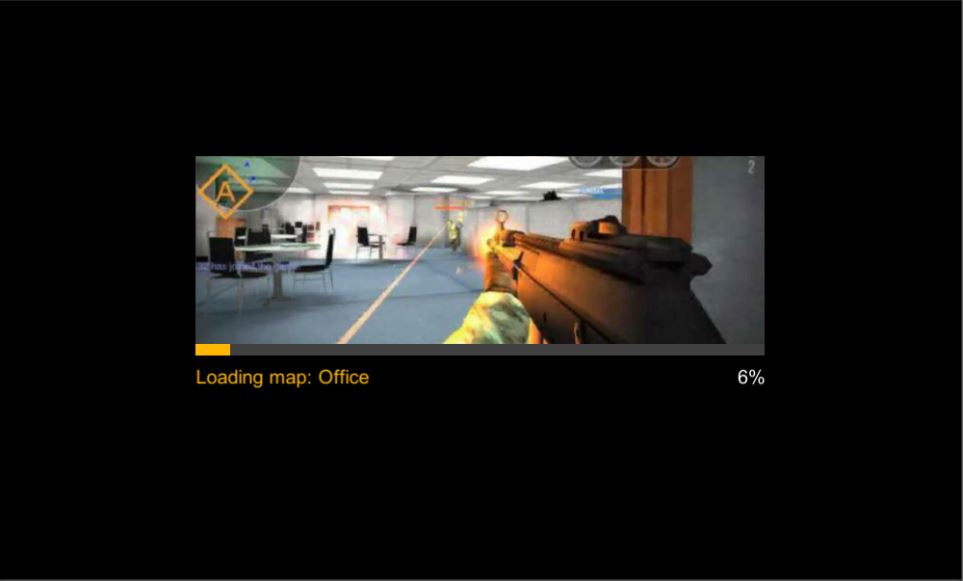
SDK contains pre-created loading screen asset in GamePlayer design. Its purpose is to save time, if your game does not contain such screen yet. This screen can be used e.g. during loading maps and other assets.
Using of loading screen:-
1) Creating loading screen |
Garter.I.CreateLoadingScreen (string assetName, texture assetImg, bool activeProgressBar);set activeProgressBar to false, if you do not want to send current time of progress to the loading screen. The bar will be hidden.
-
2) Updating loading screen | Garter.I.UpdateLoadingScreen (float progress);
If you set activeProgressBar to "true" during creating the loading screen, this is a way you can send update to the progress bar by current state of progress. 0 = 0%, 100 = 100%
-
3) Removing loading screen | Garter.I.RemoveLoadingScreen ();
Once the asset is loaded, remove loading screen by this call.
// insert this script to an object placed in scene Hiearchy
public class LoadingScreenExample : MonoBehaviour {
	public Texture mapTexture = null; // public var for attaching texture
	int updateLimit = 1001; // for test

	public void LoadAssetScreen(){
		Garter.I.CreateLoadingScreen ("Loading map: Office", mapTexture, true); // create loading screen
		updateLimit = 0; // set progress of loading screen to 0
	}

	void Update(){
		updateLimit ++;
		if (updateLimit < 1000) {
			Garter.I.UpdateLoadingScreen (updateLimit / 10); // set current progress of loading
		} else if (updateLimit == 1000){
			Garter.I.RemoveLoadingScreen (); // asset loaded - remove loading screen
		}
	}
}
3.9. Stories module
Every game contains many data-weight cutscenes, stories and animations which are displayed calmly only one time for the whole game. GSDK helps to reduce game filesizes by providing a story module — an option for downloading these stories from external storage only in a time when it’s required. Dynamic loading of game stories might be done via asset bundles or this SDK feature when the story is displayed in gameplayer above the game (like an ad).
-
1) Calling browser stories | Garter.I.RunStoryAnimation (int animationNumber);
By calling this, the game is automatically muted (via ServicesAdjustment.cs) and the animation (story) launched. Be sure that animation of such number is available for your game.
-
2) Callback in the end of animation
Once animation ends, there is a callback to ServicesAdjustment.cs file. By default, the game is unmuted via the class. You can find more about this class and its features in point 4 - Advanced features. If you customize behavior during opened modules from default behavior, be sure that sounds are muted for during story module (moduleName == "storywindow").
- 3) Setting / switching of stories
Is being made in "More" section of configuration of the project

3.10. Settings alert
Requires GameArter_Features prefab. Settings alert allows to display and hide alert icon for settings button at the prefb.
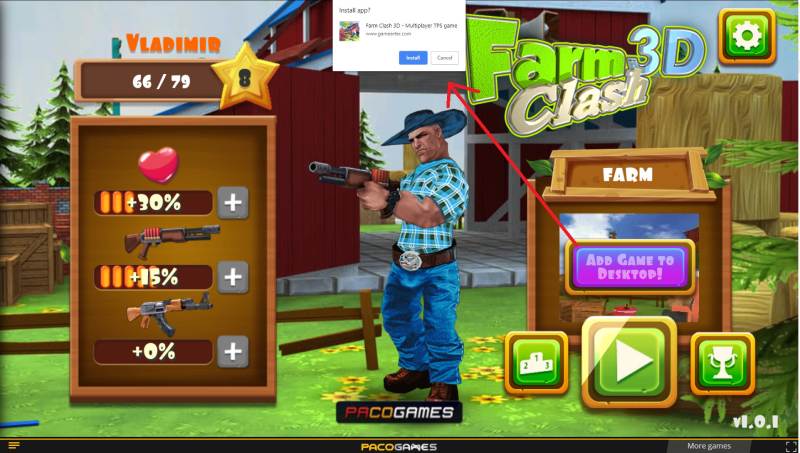
3.11 Game as App
Feature available since SDK version 2.2
GameArter SDK allows to installation of web games as Web Apps to user's device. Installation is possible to PC as well as mobile device.
Implementation
- NOTE: this feature is functional after submiting requests for publishing in GameArter.
- Icon of web app (displayed at user's screen of desktop / mobile) must be in .png format and in 2 dimensions - 192x192 & 512x512px. Name them "favicon-192.png" and "favicon-512.png" and attach to folder "_pwa". Upload this folder with other project files in "Files upload" section at GameArter panel.
-
1) External callback listener | Garter.I.AddExternalCbListener("PWAState", targetFunction);
The listener is used for setting visibility of button "installing game as app". Design of the button is up to developer.
copyGarter.I.AddExternalCbListener< string >(Garter.ExternalListener.PWAState, InstallAsAppButton); function InstallAsAppButton(state){ switch(state){ case "enabled": // Display button break; case "disabled": // hide button break; } }Button must be hidden in default.
- Next option, e.g. when a user comes to menu and there is not known state in the game →
Get current state value | Garter.I.GetStatePWA()
Returns "enabled" / "disabled". See point 1. -
2) Request for instalation
Request for adding game as app to user device is made by user's click at button "installing game as app". Returned state identifies about current state of installation. These states maz be sent to e.g. analytics for tracking click ratio.
copybuttonAddAsApp.onclick = InstallGameAsApp; function InstallGameAsApp(){ Garter.I.InstallAsPWA< string > ((state) => { switch(state){ case "rejected": // request is rejected. Be sure the request is posted only if Garter.I.GetStatePWA() === "enabled". break; case "dismissed": // user cancelled the request break; case "accepted": // user accepted the request break; case "installed": // game was succesfully installed as app break; } }); }Visibility change of button during these states is driven via listener for "PWAState", see point 1.
4. Optional adjustments
Via ServicesAdjustment.cs file there is possible to adjust running of a game in the time when the game is not active (There is active an ad or a browser module). By default, a game has same behaviour in both cases. If you are not interested to make a special action during thies events for your game, skip this section.
4.1. Behaviour during active Ad

During active ad, a game must be muted. This is made automatically by following way. If you think, you can improve it, you can adjust inside ServicesAdjustment.cs file.
public void AdOpened(){
	CacheCurrentSettings (); // cache current state - game will be returned to this state after clossing an ad (=mute game)
	// by this way, the game is muted
	AudioListener.volume = 0f;
	float minimumTimeScale = Garter.I.GetMinimumTimeScale ();
	Time.timeScale = minimumTimeScale;
	if (minimumTimeScale == 0) {
		AudioListener.pause = true;
	}
	// mouse pointer
	if (Cursor.lockState != CursorLockMode.None) {
		Cursor.lockState = CursorLockMode.None;
	}
	if (!Cursor.visible) {
		Cursor.visible = true;
	}
}
Do not work with this, if you do not understand it.
4.2. Behaviour during active module
You can customize game behaviour for every opened browser module - video / discussion / shop and so on. Set e.g. some background ambiente music. By default, during opened module, tha game has the same behaviour as during ad - all sounds are muted and minimum timeframe is set. You should keep minimum timeframe always. Music will not affected by it.
You can adjust the settings via ModuleWindowOpened(string moduleName) and ModuleWindowClosed(string name) functions. The function will be called everytime there will be a change. NOTE, it will be called everytime, that means, e.g. during switching between modules without closing the dock. From that reason, you cannot use the created function "CacheCurrentSettings()" everytime, but only for first time. Do not work with this, if you do not understand it.
5. Testing
Start your game. During ad calls, your game should be paused, without mouse. During opened modules, the game should be in the settings you set. (Paused and muted by default). Calls to analytics are visible in the console. If everything is right, you can build the project and go to the next section.
Web
6. Upload to GameArter
6.1. Uploading files
- Two ways to upload files
-
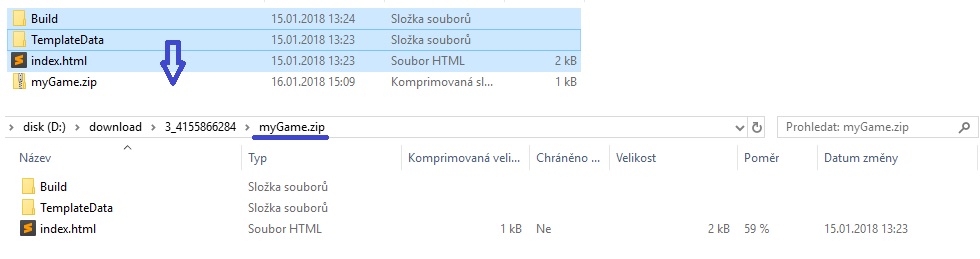
Zip package.
This way is supported in all browsers. Simply wrap all your build files to .zip format. A program allowing creating .zip files is in most systems by default. If you do not have any in your pc, you can look e.g. for WinRar.
-
Direct files.
If you sue Google Chrome, you can upload individual files by a drop and move schema. Just take file you want to upload and move it into the grey area.
-
Zip package.
- Files intended to be dynamically loaded during gameplay
There's always huge benefit to keep basic filesize as small as possible (see the importance of loading time). There is collection of files which do not need be loaded in significant percentage of game launched, or e.g. directlz from the beginning. For such file, tehre is recommended to use dynamical load in a time when they are needed.
Dynamical load may be applicated for any type of assets - cars, maps, sounds, textures.
- Assets must be uploaded to GameArter, directly inside or in any sub-folder inserted in Build folder. E.g. Build/Textures/...
- Loading this assets is then possible via relative path "Build/...", e.g. "Build/Textures/...". Relative path guarantee that the game will be alsoways load all the files from right place in right version.
- In a case of any problem or required consultation, contact Vladimir.
6.2. Adding game on GameArter
Log in to you account at GameArter - https://www.gamearter.com/. At gamearter, go to the game project and press "upload game files" button. Fill boxes and attach game .zip file. By "test now" button, you can look whether the game runs properly. If you think that your game is ready, change its status to "Published". Once this is done, save the game.
6.3. Setting GamePlayer
In a tab GamePlayer you can customize gameplayer. You can fill there game description, controls, links to social sites, add images for game loading time and so on.
7. Game releases
Managed by "Publication" section of a project.
Be sure that you enabled caching option in build settings.
7.1 First release
Once the game is ready to release, you can get a public link for free spreading in the "Publish" section of the project after pressing "Publish now button". In this case, game is automatically fully set and you can start share the game with players. In one working day since release, GameARter also will make additional check of the game and its functionality. Once the game is checked, you will be informed about result on Slack or email. If all is ok, the game will be sent to hundreds of webmasters in the system. Next day after release, the game will be displayed in reports sections of GameArter dashboard.
Important note: Once you press publish now button, the game passess from "testnet" to "release" state. In a case that your game is connected with GRT currency, any updates of events / items / packages will be visible in the game after confirmation from a side of administrators. This is a protection from manipulation with prices and affecting value of GRT token. Therefore be sure you are requesting release state when you are sure you will not update your released version of game. For testing next updates before release, you can use testnets where you can still edit all the items without any limitation.
7.2 Game updates
Game updates are fully managed by developers via Publication tab in project environment. (Project section at GameArter). After pressing "Publish now" button, previous game version is replaced for a new game version automatically. By every update, GameArter changes files location to prevent running old versions from cache. GameArter also keeps 1 old version for option to return back in a case of any found issue.
Updates are instant, there is no approval by GameArter. By this action, developer takes full responsibility for the update so be sure the new version works well.
All updates are tracked by GameArter. GameArter's staff check all updates in few hours after update to prevent potential problems.
Android
Building and releasing Android Apps is specific and allow more ways to do it. Currently, releasing apps on Google Play is with assistance of gameArter staff. Contact Vladimir (@adm?vladimir on Slack or write to [email protected] if you would like to help to configurate, build and release your game or app on Gooogle Play.