Before you start
- GameArter supports exports from Unity version 5.6 (Release date 31 Mar, 2017) and above.
Every GameArter SDK mode is designed for specific use-cases. Full SDK provides useful service which save a significant part of development time. Unfortunately, this service takes a part of liberty in the development.
- Continue only if following points are true:
- You want to solve items management fully over SDK.
- You want to solve partial game design over SDK.
- You want to use universal UI instead of own unique game UI.
Estimated time of SDK implementation: 5 hours (to test and understand all the processes). Please, follow the guide carefully. It will save you many future problems. Many unity functionality must be made via SDK (outgoing links, fullscreen and so on).
- 1. Getting started
- SDK Configuration
-
Working with SDK
- Waiting for SDK initialization
- Getting Personal data
- Accessing events
- Items property management (shop)
- Getting property info
- Working with slots
- Working with accessories
- Saving data
- game progress
- Ads
- Analytics
- Fullscreen
- Redirects / Branding
- SDK loading screen
- Cutscenes module
- Login in mid of the game
- Game as App
- Advanced features
- Testing
- 6. Upload to GameArter
- 7. Game releases
1. Getting started
- Few points you need to have in mind during setting of SDK:
- User Accounts | User accounts are connected via SDK. You do not need to solve whether a user is logged in or not, or whether you have to display login box or not. This is done by SDK in background. You use same functions and calls for every user. SDK gets and saves data for logged players as well as for guests.
- Working with data | All important data must be saved in SDK. Do not use PlayerPrefs and other local storages for saving important game data which may affect running of the game. These storages can be blocked or may crash. If data are not saved on GameArter server, there is no possibility to provide support for users in a case of any problem.
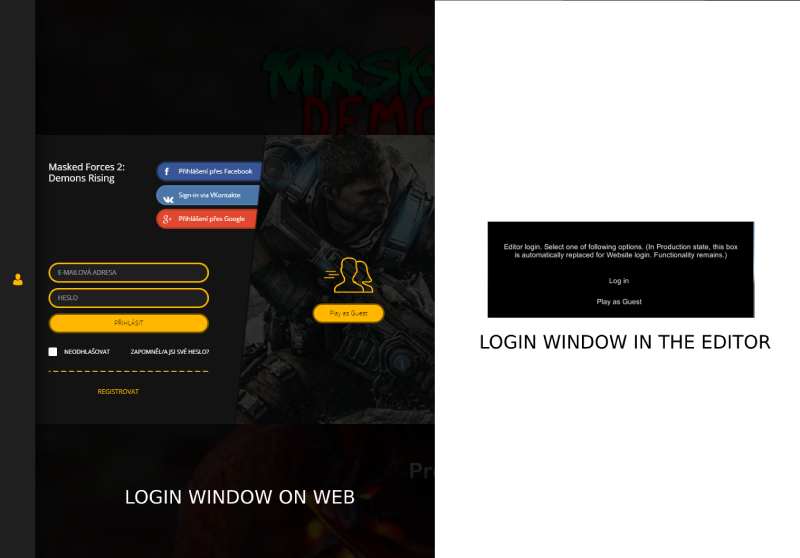
- SDK GUI displayed in the editor | SDK displays simple boxes simulating real more-complex windows displayed on the website. No box you see in the editor is actually displayed on the website, but functionality is similar. See the login example below.
1.1. Create a project
Create new game project in projects section of GameArter system.
This is way you will get your project Id for inserting to GameArter SDK. Once you will make first configuration export (see further), you will get access to the system.
1.2. Download SDK package
Download latest version of GameArter SDK Unity package from GameArter SDK Unity Package section.
1.3. Import GameArter SDK package to the game project
Path: Assets → Import Package → Custom Package [HELP]
If your project contains old version of sdk (sdk-pure), remove it. If your project contains current SDK, update changed files (except scripts you have adjusted (=GarterCallbacks) if possible).
-
Core folder -
SDK core. Do not modify any file there.
- _scripts -
Scripts required for correct function of all GameArter features. Do not modify.
- Garter.cs - SDK core module.
- GarterWWW - GameArter server connection module.
- HGarterBranding.cs - GameArter branding connection module.
- HgarterBrowserServices.cs - GameArter browser services module.
- HGarterClickListener.cs - GameArter click-listener module.
- HGarterGui.cs: - GameArter GUI module.
- HGarterInit.cs: - GameArter init conf module.
- HGarterPlayerPrefs.cs: - GameArter PlayerPrefs module.
- HGarterScreenShot.cs - GameArter screenshots module.
- Editor -
GameArter Editor workers & customization. Do not modify.
- HGarterBrandingEditor.cs - GUI customization
- HGarterEditor.cs - GUI customization
- HGarterInitEditor - GUI customization
- Plugins -
Plugins required for correct running of SDK. Do not modify.
- GarterBrowserManager - Browser connection
- GarterProtection - Steal & data protection
- link.xml - Assembly config file
- Newtonsoft.Json - Data management
- Newtonsoft.Json.dll - Library for data management
- Resources -
Resources required for correct running SDK. Do not modify.
- GameArter_LoadingScreen - Prefab for loading screen
- Garter_Notification - Prefab for notifications
- Garter_sdk - Prefab for accessing core functions.
- sdkgui - Textures for GameArter SDK.
- LiteSDK -
Contain a prefab usable in LiteSDK mode only
- GarterLite - Prefab which keeps lite data available in all scenes
- GameArter_Branding - Prefab containing brand logos. Logos are presented by white elements. Their real images and links are downloaded on the base of currently using brand. Also designed for placing own open web-window requests.
- GameArter_DashBoard - A box containing user profile informations and indicator of a progress in the game.
- GameArter_Features - A box, via which a user can open features connected with a game. It may be leaderboard, badges, shop, sharing, login and settings.
- BasicSDK_interaction -
Callback catcher for Basic SDK
- GarterBasicCallbacks - Class for listening callbacks for BasicSDK
- LiteSDK_interaction - scripts for interaction with SDK running in lite mode
Classes (examples) for communication with GameArterSDK
- DataManagerExample.cs - Class for working with data
- ExampleObjectForSdkInteraction prefab - Example object for placing to hiearchy window for working with data
- FullSDK_interaction -
Callback catcher for Full SDK
- GarterFullCallbacks.cs - Class for listening callbacks for FullSDK
- ServicesAdjustment.cs - Script via which you can individualize the behavior of your muted game.
- GameArter_Initialize prefab - Pre-created prefab for placing to project. Consists from an empty object with associated HGarter_init.cs script.
- readme.txt - Basic informations about the SDK.
- copyright.txt - Copyright - all rights reserved.
Prefabs Folder Prefabs you can place to your scene.
Folders with scriptes designed for SDK modes
1.4. Switching to WebGL project
Path: File → Build Settings → WebGL → press "Switch Platform button" [HELP]
If WebGL is not on the list of platforms, there is need to install it first.
1.5. Fixing possible errors
- Duplicity of Newtonsoft.Json library | More newtonsoft.json libraries is available in the project. Solution: Let one and remove all remaining. Usually, this occures when you have Photon sdk in your project. Photon uses newtonsoft for some operations in the editor. You can fix duplicity by unchecking option "Editor" in Assets/Photon Unity Networking/Editor/Newtonsoft.Json.
- Missing plugin | Check what platforms are selected in plugins setting. [HELP]
- You should place no SDK scripts to hiearchy manually. All scripts are loaded automatically. If you insert some there, SDK will not work properly.
- Missing Prefab | Some OS do not load prefabs to example scenes. In such case you see GameObjects "Missing prefab".
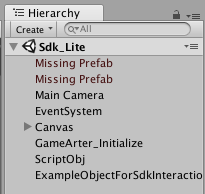
The prefabs are not necessary for right function of the SDK, however, there is recommended to add them to the example scenes manually to see the benefit of using them. These prefabs ara available at Assets/GameArter/Prefabs folder. Drop prefabs GameArter_Features and GameArter_DashBoard and move them into scene's hiearchy window. - Info about missing prefabs in Hiearchy window inside example projects. There may happen during Unity upgdares, that there is lost link to a prefab. If this happen, simply go to GameArter/Prefabs folder and move prefabs GameArter_DashBoard and GameArter_Features back to hiearchy. In a case that also GameArter_Initialize object is reseted (projectId = 0), there is better to reimport SDK to the project again to see example scenes in functional state.
- Need a help?GameArter Slack: @adm_vladimir / email - [email protected] /
2. SDK configuration
SDK works on a principle of server-driving. Game side contains only a basic data configuration - keys definition. Keys defined in the game side are further extended by server-side configuration, where is possible to add achievements, leaderboards, upgrades and other adjustments on the keys defined in the game. In running mode, SDK automatically connects keys with their configuration and manages all their properties entirely autiomatically. (You do not need to care when to give a reward, write to leaderboards, unlock item to buy and so on.)
2.1. Game side
Follow the guide:
- Open first scene of your project
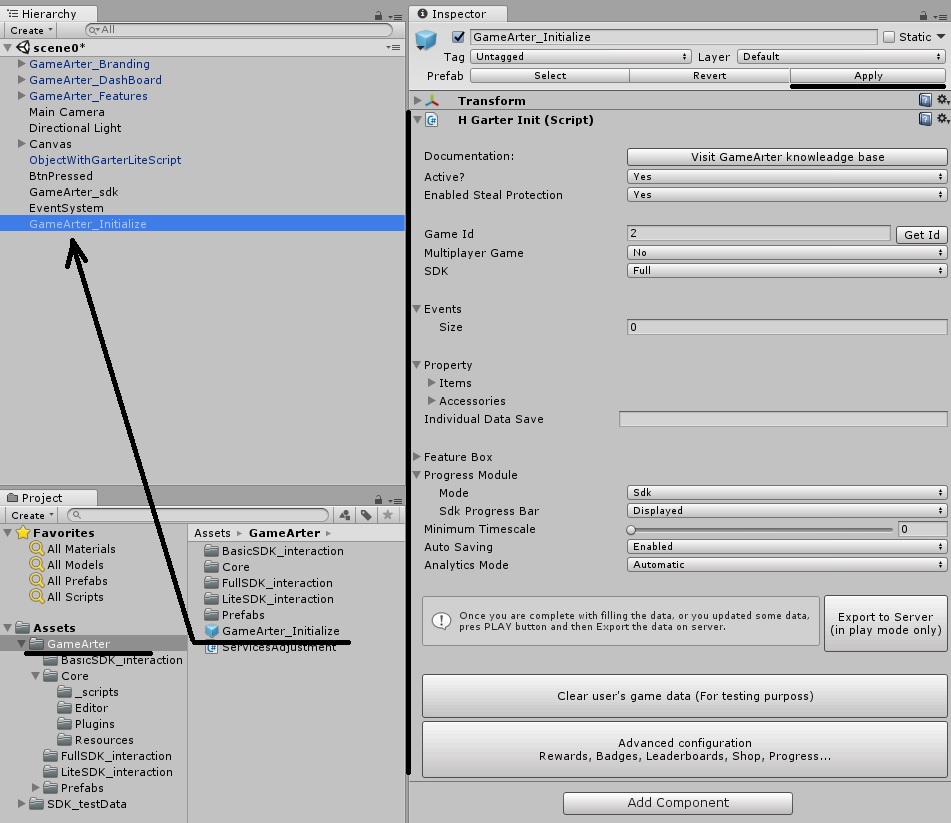
- Find GameArter_Initialize prefab in Assets/GameArter (Project window)
- Move the prefab (or create an equivalent object containing HGarterInit.cs script) to Hiearchy window
- Select GameArter_Initialize object in hiearchy of your project
- Fill all options on a basis of documentation below. Use button apply for saving your changes.
-
1
Documentation
A button opening knowledge base you are currently at. -
2
Active?
A switcher via which you can enable / disable run of the SDK. -
3
Enable theft protection
Disable only if you need it for testing on your local machine. With active protection, the game is protected from illegal running. Whitelisted servers: localhost, gamearter.com, pacogames.com and all their subdomains. -
4
4.1 Project ID
Every project must have own unique ID. Project ID is a signature needed for communication with GameArter services. You got this id during creating your project in projects section of GameArter system. (point 1.1)
Note: Do you have a problem that your filled project id is reseted to default on going to play mode?
This is something what many developers may experience after removal of "apply" button on prefabs by Unity. To eliminate it, use one of following
- 1) You can use your own game object instead of teh use of prefab (see notes of this section - Option 2 - own object)
- Check whether you work with the prefab correctly. There is a reason between changing projectId and other values in the prefab placed in hiearchy and in the prefab placed in the project window.
4.2 Project Version
For possibility of testing, GameArter provides to run up to 5 game versions. Every version has separated configuration and databases.
-
5
Multiplayer game
Select, whether your game contains multiplayer mode (it can be played as a network multiplayer game)
If yes, select, whether the game will use GameArter photon ID or your own.
Price of using GameArter Photon ID: 10% of income share.
If you set wrong game type (singleplayer / multiplayer), GameArter services (ads, modules) will not work properly and you will have to rebuild the game. -
6
SDK
The mode, under which the SDK will run. Select Full. -
7
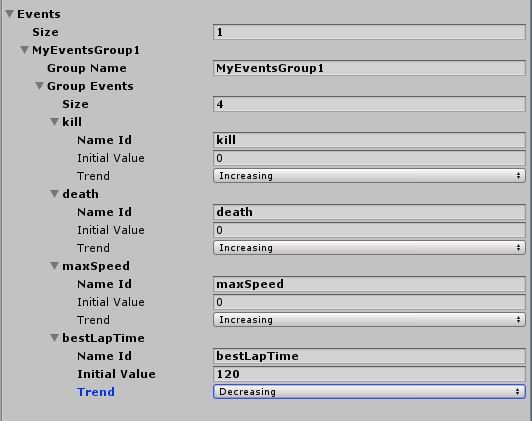
Smart Events
Smart events - Achievements, Leaderboards, IAP and more easily
Before implementation, please read and try to understand Events purpose - In-game currency distribution. According to the event specification, make a plan, which game data will be saved as events and which as a different type of data.
Event explanation
Examples:
Event is an important variable connected with a feature (leaderboard) or a reward (achievements, currency reward), or with a shop for direct in-app purchases. Event example: kills in a shooter game , lap time in a racing game, number of gints in a logic game... Value of event can be increasing, decreasing or without defined trend. Events with defined trend can have attached unlimited number of badges on every event. There can be active also leaderboard above these events. Events with undefined trend are designed for direct connection with in-game shop. There is a possibility to work with events in many ways, events are written generally to allow anything a developer may need.-
"kills" event = total number of kills in a game
Initial value is 0 (new player). The number of kills can only grow in a time (= event with increasing trend). There will be a leaderboard connected with the event (most kills in the game). There will be badges - 1st kill, 10th kill, 100th kill... Leaderboard and badges are made and distributed by SDK. Developer only needs to keep best "kills" value in events = update the event with every kill. Required "kills" value for events is set on server (point 2.2). Then, once the value of the event will achieve the value of a badge, SDK will reward the badge to a user automatically. If a user sends a request to see a leaderboard, the SDK will create the leaderboard by comparing "kills" values of all users in the game. -
"bestLapTime" event = the lowset time achieved in a lap
Initial value is any not-null number. E.g. 120 (secs). Lower time is mostly better (= event with decreasing trend). There is a leaderboard for the time in the lap (made by SDK on basis of the best time of all users who completed the lap). There are 3 badges for the lap - gold / silver / bronze time. At the end of every lap, the developer checks time saved in the event "bestLapTime" and if current time is better (lower), he updates best achieved time in the lap. -
"maxAchievedMoney" event = a special help event allowing give own badge
This is a special event allowing to give a badge on basis of a dynamic variable. E.g. there is a need to add badges "Earned 1st dollar" and "Millionaire". The badges are connected with a currency which has dynamic value changeable in both directions. Then, if currency value will achieve a specific milestone, you can update event "maxAchievedMoney" and a user will be rewarded by a badge. -
"hints" event = number of available hints for a player.
Let's say a logic game will not contain any in-game currency, badges or leaderboards. All required functionality is implementation of in-game purchases. A user has certain number of hints to use (either one-time only, or every day) and in a case of need, he can buy more for GRT currency via native GameArter shop system.
Another possible event use-caseInitial values of events are changeable in web environment as well. Thanks to this option, events can be used also for game testing - If you set e.g. items to be unlocked on basis of some event value, you can unlock them directly from server without need of game rebuilding.
size | set number of groups in which you want to have events divided (better clarity)Group name - name of a group of eventsGroup events - number of events in the group- NameId | ID name of the event. Name in lowercase letters, without spaces. this is string ID over which you will get and set values for the events.
- Initial value | initial value of the events. (probably 0 for increasing trend, any number > 0 for decreasing trend, any number >= 0 for undefined trend)
- Trend | select, whether the event has increasing trend (value number is better (kills), or decreasing (lower number is better (best time of the lap), or undefined trend - this event is intended for monetisation - e.g. option to buy XY hints.
-
"kills" event = total number of kills in a game
-
8
Property
By property we understand all game items a user can interact with (unlock / buy / upgrade). Managing these items is going by a web-based shop which looks and acts like classic ingame based shop (shop is opened in the same window in a layer above the game). Developer manages shop without need of any coding in a web-based administration. Property schema is very powerful tool you should understand and use.
Two types of game property
-
1. Items
Item is main game object - a gun, car, garage... Items are able to work independently but allows to assign any number of accessories. -
2. Accessories
Item accessories, as their name say, are accessories for items. Accessory is e.g. an ammo stack for a gun or an engine for a car. Every accessory can be shared between more items. (more cars can have same engine, more weapons same ammo stack or sightseer. Once the engine is improved (upgraded) the engine is improved in a case of all items).
Properties are defined on game side by developer (filling items / accessories) and exported to server. Management of properties is solved by web-based administration. Using property feature does not require any programming.
Advantages of using property feature- Simple and safe items management - You do not need to solve a way of saving and working with items
- Item shop - you can generate web-based ingame shop which looks and acts like classic ingame based shop without any programming. Users uses this shop for interaction with game items - buying, upgrading, adjusting.
- In-game purchases - By running in-game shop, in game purchases are available and active automatically.
- Basic game design - You can set game design on a base of events-items combination. In events schema, every achieved event can generate game experience. You can use this experience as a point for unlocking game items. User will have to play and fill tasks to get experience to be able to buy next items.
Items management: by items management you can control all items and their properties from a web-based administration. Every change will be automatically reflected in games.- Upgrades: Item upgrades are basically about a value which is used in a game. Eg. we can have a car with default power value 100. By using upgrade items, you can add e.g. 5 upgrades for the car with power value 120, 140, 160, 180 and SDK will return to the game power value on a base of user's state. This can be used also for value optimization - you can dynamically tune performance of various weapons to make your game as addictive as possible.
- Game-gui for interaction with items.
Beside shop for buying and improving items, GameArter will later support also next GUI for item-accessory interaction (selection what accessory to select for what weapon).
Item slots: Explanation: Slot is a space for game item. Here're example use-cases:- Active items manager - Let's say a game allows to have 3 weapons in the same time. (keys 1,2,3). Every slot = 1 key with associated weapon.
- weapons can be replaced by garages for cars or any other use-case
- By defualt, slots are filled by items with state "selected" (defined in Garter_Initialize object).
- Slots brings following advantages:
- Simple management of selected items (via game or shop gui)
- Visibility in analytics = information about popular items
- Monetisation = there can be possibility to buy next slots for GRT currency
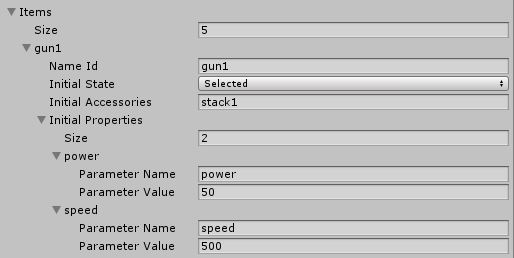
Items | Size - set number of game items- NameId | id name of the item. Name in lowercase letters, without spaces. this is string id over which you will get and set item properties.
- Initial state | initial state of the item (state in which a new user will have the item)
- Initial accessories | initial accessories assigned to the item. Accessory separator is optional. Recommended separator is "&". Let free if no accessory is assaigned.
- Initial properties | initial properties values. These values can be changed by purchasing upgrades.
Accessories | Size - set number of game accessories- NameId | id name of the accessory. Name in lowercase letters, without spaces. this is string id over which you will get and set accessories properties. Accessories are accessible by same way as items.
- Initial state asc | initial state of the accessory (state in which a new user will have the item)
- Initial properties | initial accessory values. These values can be changed by purchasing upgrades.

-
1. Items
-
9
GameArter features
Feature box is a prefab which you can insert to a scene. The box contains quick buttons for opening GameArter features. Its icons are displayed automatically on basis of available modules (badges, leaderboards, shop...). Following list contain buttons which is not possible to display automatically - their visibility depends on developer's implementation.
- Settings button | set, whether you want to display settings button. Once is pressed, a function "SettingsButtonPressed()" (inside GarterFullCallbacks.cs) is called. From there you can open own settings screen.
-
10
Progress mode
SDK allows three types of counting user's game progress. Value of user's progress must be always saved in the SDK. This information is needed for displaying game info (progress, badges...) in the user's profile.
Current progress state can be displayed also in the game. If the game does not contain GUI for this value, there is possible to display user's progress with other user's data over GameArter_DashBoard prefab. If you want to use GameArter_DashBoard prefab, but without progress bar, switch its visibility to state "hidden".- SDK | progress is being counted on a basis of received badges. (2 badges of 10 = progress 20%). You can display the progress in your own GUI, or via GameArter prefab GameArter_DashBoard prefab. If you want to use GameArter_DashBoard, but without the progress bar at the bottom, you can switch options of SDK Progress bar.
- Individual | SDK does not count progress, only holds its value. There is always need to send changes of user's progress into the SDK. Progress can be displayed in your own GUI, or via GameArter_DashBoard, see the point above.
- None | A game does not contain progress feature.
-
11
Minimum timescale
When an ad is being displayed, sdk automatically will set minimum timestamp to keep low requirements for performance. Set this to 0 if your game is not sensitive for this parameter. -
12
Auto Saving
if is enabled, sdk saves game data in regular intervals taking into account changes of data in the SDK. -
13
Analytics mode
GameArter has implemented analytics plugin for sending data to Google analytics. This plugin may run under 3 modes.- Automatic | Sdk automatically detects scene changes and sends them to analytics. Beside this automatic mechanism, you can sending also any own events.
- Manual | Only your own requests go to analytics.
- OFF | Plugin is disabled. Analytics displayes only standard web-based data.
-
15
Save the configuration.
- Save the filled data to prefab by pressing "Apply" button
- Press "play" button in the editor (Play mode) and export the configuration to server by pressing Export on server button.
After pressing export button, there is need to approve the request (rewriting previously exported data) in a web-based window.
See more about exporting the configuration in point 2.2
-
16
Clear user's data button
Via these buttons, there is possible to clear user data saved in a storage. This is very useful for testing right implemenation of the SDK.
-
17
Advanced configuratin
Opens server-side configuration environment. It is available after exporting game-side configuration via button Export to server.
2.2 Game configuration exports
Exports can be made via Export button available at GameArter_initialize object. With every export, configuration made at a game side is exported to server side (set events, currency option, network option ...)
2.2.1 First game configuration export
First game export is a proof of start of SDK implementation. Once first export is made, you will get an access to server configuration of your project (available in projects section).
2.2.2 Next game configuration exports
You can adjust settings made at game side (in the unity) dynamically during your development. You can add new events as well as remove old. With every export, new data are exported to server and you can manage them in the project section. Every export offers various options - you can clear previous exported data or update them about new data. On basis of mode you will select, you will, or will not lose previously fileld data (badges, packages, rewards...).
2.3 Server side configuration
Server-side configuration is for adjusting data filled in the game (in production mode, without need of rebuilding a game) and for adding additinal SDK features as badges, leaderboards and in-game purchases. Configuration is manageable via the project panel.

- Rows / Buttons explanation:
- Version | exported project version (filled in Garter_Initialize object inside unity)
- Version State | project mode - testnet / production (=public released version)
- Interpreter | interpreter under which the project version runs
- Config status | Status of data state - concept / pending (= waiting for authorization by admins) / live (= in production)
- Events button | Opens events configuraion (= rewards, badges, leaderboards)
- Items button | Opens items configuraion
- More button | Opens configuraion of additional features
- Saved data button | Opens environment for reading / changing data of logged (developer) account in the game
- Files upload button | Opens environment for uploading game files
- Test the game button | Opens game in a new tab
- Remove button | Removes project version
-
1
Events configuration
- Server-side contains all exported events. If not, contact support.
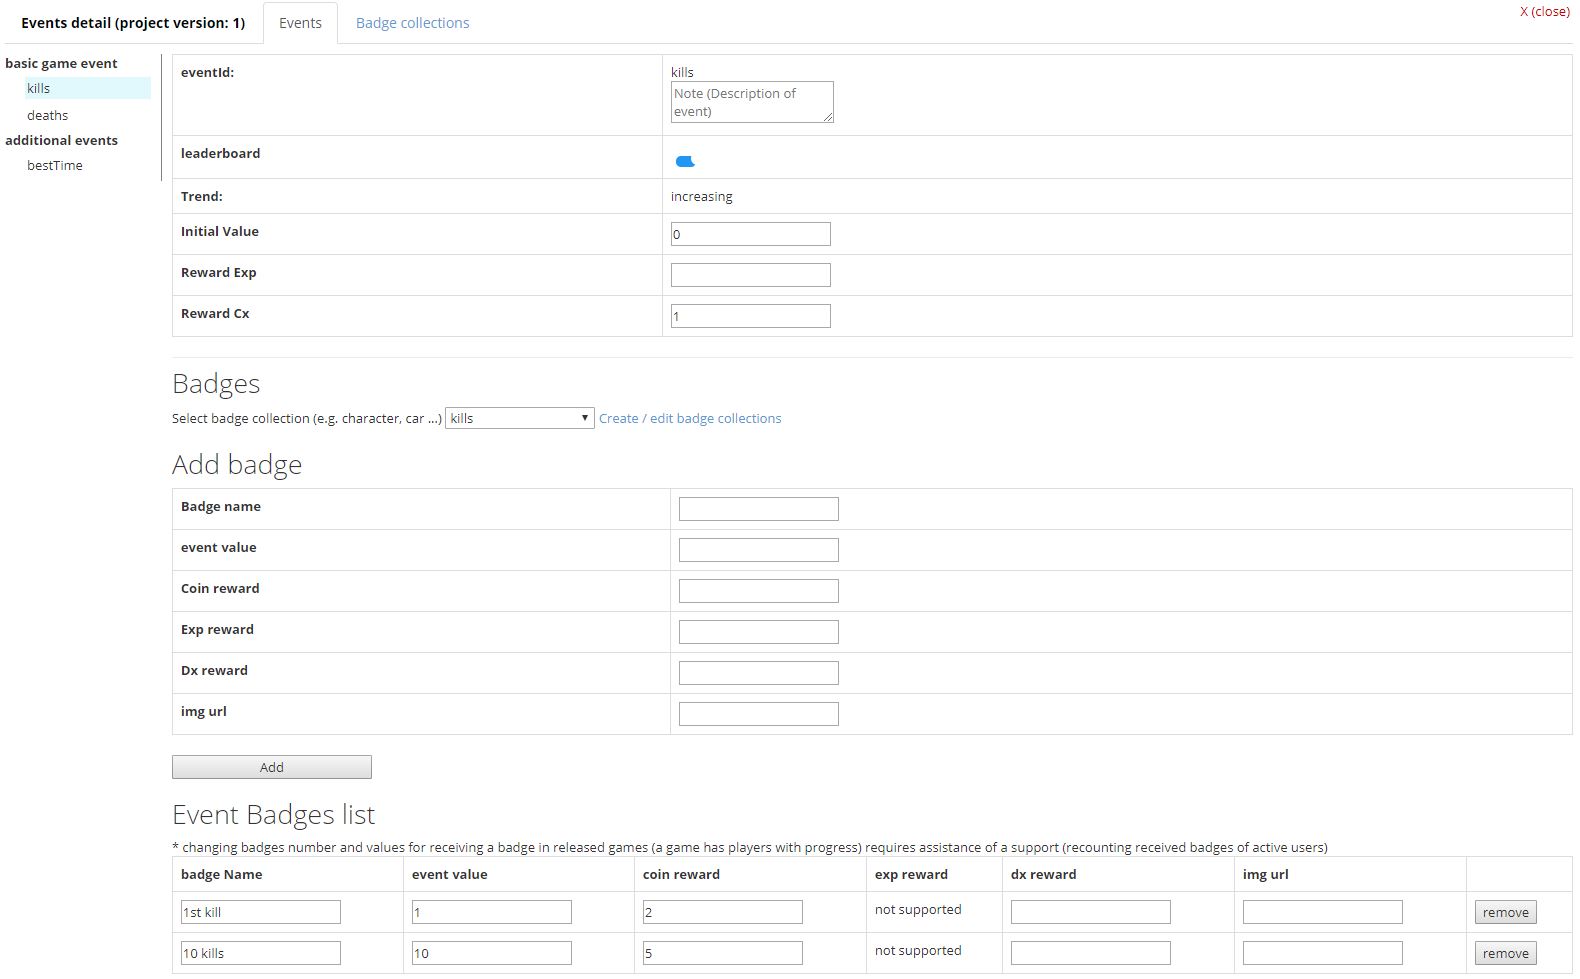
EventDetail- Event ID | non-changeable string ID. All data you will fill for the event are associated with this ID. If you change its name / remove the ID, all associated badges and leaderboards will be lost. Do not change this, if it is not necessary. If so, contact support for possibility to convert users' data below the new event ID.
- Leaderboard | Checkbox for activation of leaderboards for the event. SDK automatically creates leaderboards for the event. There are leadeabords created with filters 1 day / 1 week / 1 month / all-time. Trend of leaderboards is intended by event trend.
- Trend | Trend of event. From safety reasons, there is no possibility to manipulate with events in both directions. An event can only grow (increasing trend) or fall (decreasing trend). Usage: increasing trend - total number of kills, number of opened maps. Decreasing trend - best time of a lap.
- Initial Value | Initial value of event. By this, you can overwrite initial value set in the game. This value is returned to all new players. Default value for events with increasing trend = 0. Default value for events with decreasing trend - none, need to be set.
If availability of some item depends on a state of event value, this is way you can set the item property for new users without need of rebuilding game, directly on one click from server. - Reward Cx | Reward for occured event in a currency depending on a native game currency. (Full SDK = GRT, Lite SDK = GRT/local game coins on basis of local game coins existence). Reward is for a change about one unit. Examples:
- kill event - a coins reward for 1 kill
- lap of a round - better time lap about 0.2sec → reward per 1 unit (=1sec) = 1coin → 0.2*1 = 0.2 coin reward.
- Reward Exp | available for Full SDK mode only. Works same as Reward cx, only the reward is in game experience. On basis of achieved experience in the game by users, there is possible to automatically manage items - unlock them for using (see more in items configuration). This feature allows to create basic game design.
Add badge- Badge name | Name of a badge you want to add (e.g. 100 kills)
- Event value | Event value on achieving which the badge will be received (= 100)
- Coin reward | Received coin reward for received badge.
- Exp reward | Received coin reward for received badge. (full SDK only)
- Dx reward | Received diamonds for received badge. (rewards disabled currently)
- img url | image of a badge. Fill name of image file. If you do not have an image for the badge, let it be.
Event Badges List | list of created badges. You can adjust already defined badges here. If your game is already released and badges are rewarded, and you want to change value for a received badge, please contact support. Badges of all players will have to be recounted.
Badge Collections | Group more badges to a defined collection. Max number of collections is three. E.g. Character, car, others. Badge collections do badge listing in GUI clearer.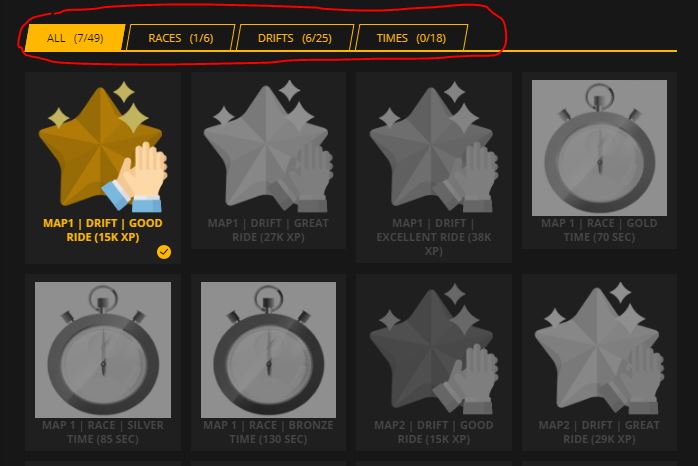
Saving events configurationFilled events must be saved. There are 2 options of saving. "Save as concept" saves the changes as a concept only - these saves are not visible from game. If you want to save the data and have access to them from a game, save them via "Save to production" button. If you do bigger changes for a project in production state "live", there is a need of approval by administrator. It is to prevent clashes which would lead to possible game crashes after changing values for badges, eventIDs and so on.
-
2
Items configuration
All in-game defined items were exported to items server configuration module. (Export made in section 2.1/15).
Via this section, you can set ite prices, experience for unlock, add upgrades and do stack management.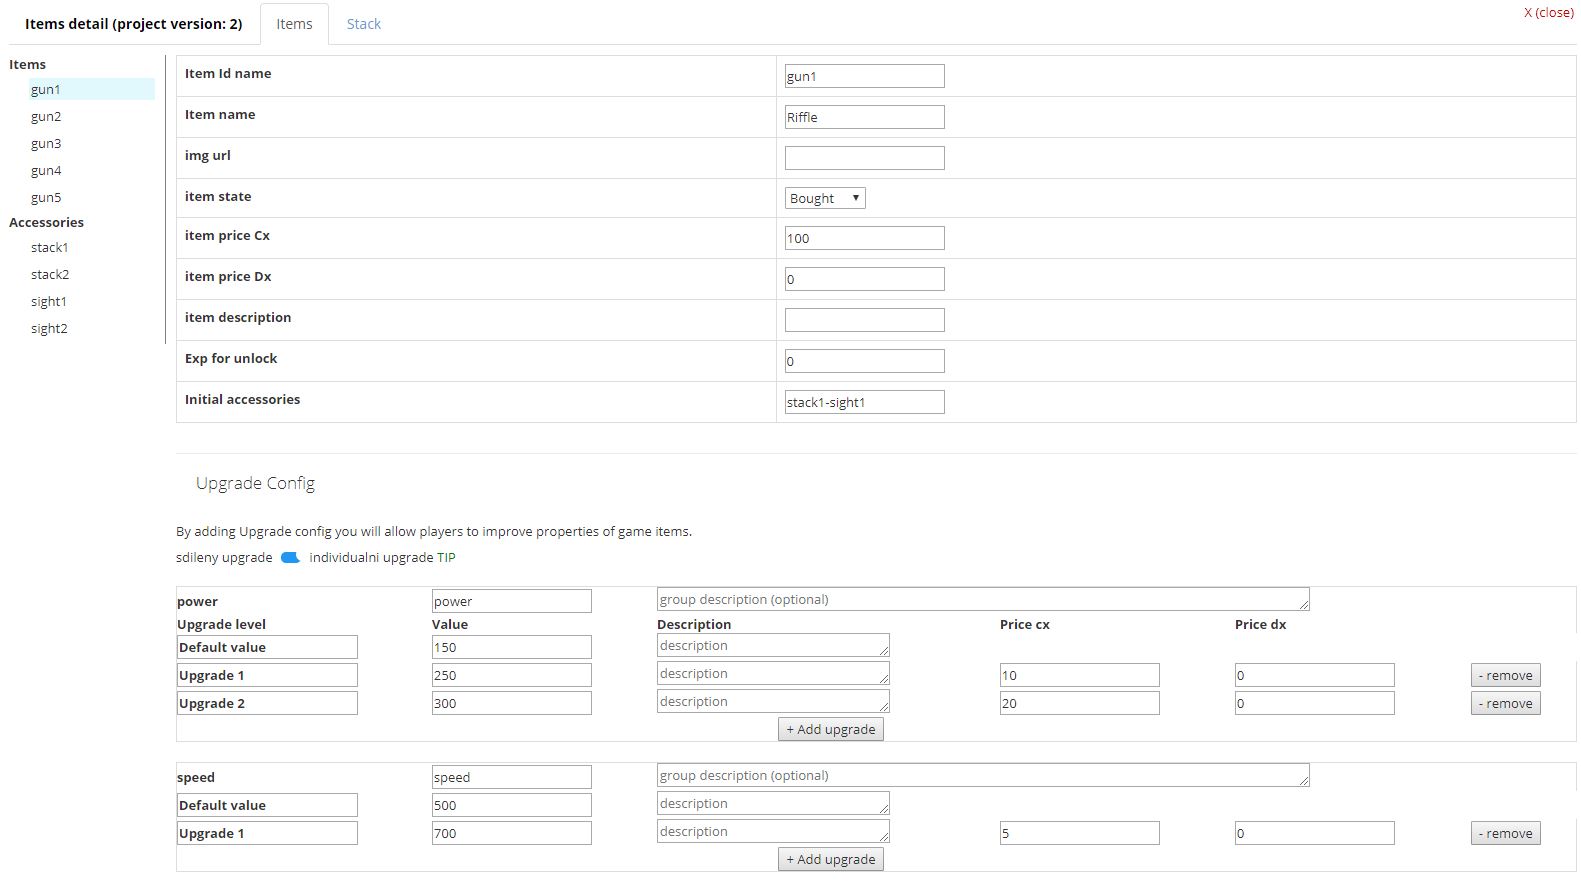
- Item Id name | item string id for accessing item properties
- Item name | Name of item (displayed in the shop)
- Img url | Url address for item image (displayed in the shop)
- Item state | Initial state of the item.
- Item price cx | Price of item in GRT.
- Item price cx | Price of item in DX. (disabled)
- Item description | Description of the item (displayed in the shop)
- Exp for unlock | Amount of experience since the item will be unlocked for a user.
- Initial accessories | Initial accessories of the item.
Via upgrade config, you can extend the default item state for upgrades.
2 type of upgrades configuration-
Shared upgrade - designed for needs to improve all item properties by every upgrade
- Values to fill:
- Upgrade name | designation of the upgrade (displayed in the shop)
- Property values | new values for item properties
- Upgrade description | Note for the upgrade (displayed in the shop)
- Price Cx | price of the upgrade in GRT
- Price DX | price of the upgrade in Diamonds (disabled)
-
Individual upgrade - designed for needs to improve item properties separately
- Values to fill:
- Item property name | Clear name of the property (displayed in the shop)
- Property description | Description of the property (displayed in the shop)
- Upgrade name | designation of the upgrade (displayed in the shop)
- Property values | new value for item property
Saving items configuration- Save as concept | saves data for next adjustments. Data are not accessible from game.
- Save to production | saves data to production database. Data are accessible from game.
3. Working with SDK
Working with data is a matter of GET and UPDATE SDK calls. By default, all game data are saved in SDK game data layer (RAM memory) which is being automatically synchronised and verified with server data layer. This guarantees immediate availability of all data in a safe form.
GameArter SDK work with classic callbacks. In some cases, there are callbacks for calls which did not occur from a side of a developer. E.g. on SDK ready callback or pressing settings button. Since version 1.3, SDK uses delegates function for this. Older SDK versions solves this via separated class.
3.1. Waiting for user authentication & game-data-layer initialization.
Once a game is loaded, SDK automatically authenticates a user and loads his data. It takes few miliseconds. This is time your game needs to wait till SDK is get initialized.
Delegates function are implemeneted since ver 1.30 of SDK. In older versions, there is separated callbacks class.Settings dlegate function for external calls from SDK
- Create new C# script
- Copy body of "Assets/GameArter/Examples/FullSDK_mode/GarterFullCallbacks.cs" into the script. Do not forget to change class name.
- Create new Empty object in hiearchy of same scene which contain GameArter_initialize Object
- Move created script on point 2 to this Empty object.
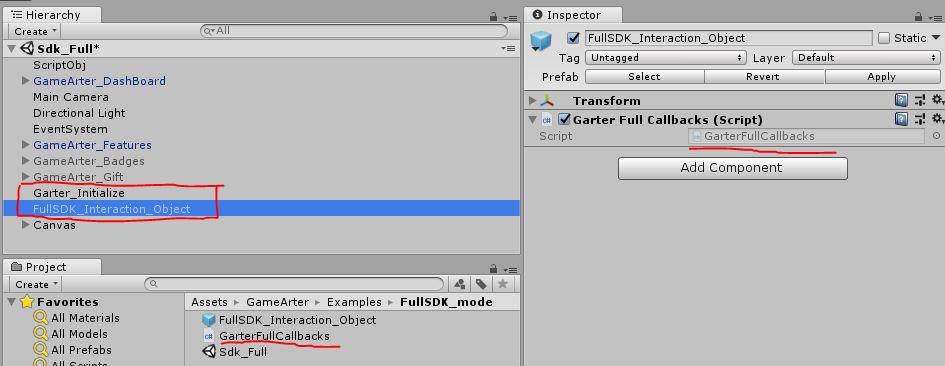
By this action, In the case of updates your scripts will not rewritten.
When you open the created script, you will see following body:
using UnityEngine;

public class GarterFullCallbacks : MonoBehaviour {

	void Awake(){
		// ADD LISTENERS FOR EXTERNAL EVENTS
		Garter.I.AddExternalCbListener< GarterWWW >(Garter.ExternalListener.SdkInitialized, SdkInitialized);
		Garter.I.AddExternalCbListener< string >(Garter.ExternalListener.ExternalSettingsButtonPressed, SettingsButtonPressed);
		Garter.I.AddExternalCbListener< string >(Garter.ExternalListener.EventExternalUpdate, EventUpdateViaShop);
		Garter.I.AddExternalCbListener< string[] >(Garter.ExternalListener.ReceivedBadges, BadgeReceived);
		Garter.I.AddExternalCbListener< float >(Garter.ExternalListener.CurrencyUpdate, CurrencyUpdateInOwnGui);
		Garter.I.AddExternalCbListener< string >(Garter.ExternalListener.PWAState, ProgressiveWebAppState);

		// Attach this class to Dont destroy on load - variables and functions will be available in every scene
		DontDestroyOnLoad(transform.gameObject);
	}

	private void SdkInitialized(GarterWWW www){
		Debug.Log ("Full SDK Initialized - all data, features and calls are available");
		Debug.Log ("UserNick: "+Garter.I.UserNick());
	}

	private void SettingsButtonPressed(string emptyString = null){
		Debug.Log ("GARTER CALLBACK - open settings");
	}

	private void EventUpdateViaShop(string emptyString = null){
		// In the external shop/exange, users can use their money
		// for changing value of currency (see CurrencyUpdate) as well as events
		// with "undefined" trend. These event occurs, when any event with
		// undefined trend was changed via in-game shop (by purchase).
	}

	// received badges callback - useful for a case you want to display a special screen or image
	private void BadgeReceived(string[] badgeName){
		// Badges (Achievements) are distributed automatically in realtime
		// on basis of updating defined game Events.
		// In that moment, list of received badges is sent to this functions.
		// By default, a user see a small notification about received badge
		// in top left corner and alert icon on badges button (part of "GameArter_Features" prefab).
		// This function can be used if you wish to display a bigger image or any action you want.
		for (byte i = 0; i < badgeName.Length; i++) Debug.Log ("Badge received | "+badgeName[i]);
	}

	// external change in currency state - purchase in a shop, reward from a badge...
	// gui of gamearter prefabs is being updated automatically
	// use this for updates of currency value in own GUI
	private void CurrencyUpdateInOwnGui(float currentValue){
		Debug.Log ("new currency value: " + currentValue);
	}

	// External change of Progressive web app state.
	private void ProgressiveWebAppState(string state){
		// Install as app button visibility (See point 3.17).
		Debug.Log ("Progressive Web App State: "+state);
		if (state == "enabled") {
			// display button "install as app"
			buttonInstallAsApp.SetActive(true);
		} else if(state == "disabled"){
			// hide button "install as app"
			buttonInstallAsApp.SetActive(false);
		}
	}
}
At the top, there is definition of listeners. First of them is "SdkInitialized" event. This is the event you need to wait at the beginning. Once SDK is initialized, this function is called and game can access and set all users data (nickname, multiplayer...). Purpose of other event listeners is mentioned by comment text in body of teh functions.
3.2. Getting personal data
Use following requests for getting personal user data according your needs. (Updating GUI, sorting users, setting language for game...)
public class SomeClass {
	// User's data
	string userNick = Garter.I.UserNick(); // returns usernick
	string userPreferedLanguage = Garter.I.UserLang();
	string countryUserIsConnectedFrom = Garter.I.UserCountry();
	Texture2D userProfilePhoto = Garter.I.UserImage ();
	string userRankName = Garter.I.UserRankName();
	string userBrowser = Garter.I.GetBrowsername();
}
3.3. Accessing events
Events keep values in secure way (encrypted state) while they are optimized for maximum possible performance in the same time. There is possible to think about events like about helper functions - Event feature is simple automated way to protect important data from manipulation (cheat engine), use achievements (badges), leaderboards or IAP.
- Events with defined trend (increasing / decreasing) - keep best achieved value and automatically manage configured achievements and leaderboards
- Events with undefined trend - keep current value and allow connection with in-game purchases (if configured)
-
Get | Garter.I.Event (eventNameId);
returns (decimal)value of required event
-
Update by change | Garter.I.Event (eventNameId, change);
The function updates value of the event based on trend. Examples:
- Garter.I.Event ("kills", 1); where "kills" are defined as event with increasing trend → Increase value of kills about 1
- Garter.I.Event ("lapTime", -1); where "lapTime" is defined as event with decreasing trend → Decreases value of lapTime about 1
- Garter.I.Event ("freeHints", 3); where "freeHints" is defined as event with undefined trend → Decreases value of lapTime about 3
Events with defined trend do not allow to use negative change - such values are ignored
Update events value always by sending a difference (change to better. Example: when kills value goes from 11 to 12, you sends 1 (= the difference). When time of the best lap goes from 121.3 secs to 118.4 secs, send 2.9). Pay attention to correctness of these values.
-
Post absolute even value | Garter.I.EventAbs (eventNameId, absEventValue);
Sometimes it may be simpler to send absolute value instead of relative value (size of value change). For this case SDK has helper function "EventAbs". All this helper function does, it is counting the difference between sent absolute value and saved previous value, and forrwarding this difference (change) into "Even" function described 1 point above
This function is available since SDK ver 2.4
Important: How and in what frequency events data are posted on the server
As mentioned, events are designed to work for any requests frequency (calmly 100s per second) while they are also managers of all events-related features. For this reason, events are not posted to server storage on every event request, instead only if one of following is conditions becomes true:
- During every event update, there is a check for achievement (badges). If a certain value for a badge(s) is achieved, SDK automatically sync data (posts event values), and release the badge(s) and associated rewards (game money, if configured) for the user. Developer is informed about released achievements and rewards via callback trigger ("ReceivedBadges"), see Event listeners section in SDK initialization.
- On every update change, SDK checks time of the last update data. If there is reached certain maximum time from the last update, SDK automatically post the data to server to keep them synchronized between game and server. This time is usually 2 minutes, but may vary based on current server capacity.
- Saved data in events are automatically attached to every Post request to server made by developer (use of Garter.I.PostData function)
Best practice for saving event values on server
The rules described above are simple to understand, but complicated to work with. Fortunately, there is a simple best practice that comes from the bullet 3. Everytime you think, that the reached value is importnat (not because of achievement), post data on server (see how in point 3.6.2).
NOTE: If all you need to save are event values, and you do not use any other data which must be saved on the server, then you can use a request with general key (e.g. "key") and fake data (e.g. empty string). It would look like Garter.I.PostData< string >("key", "")
If there would happen, that more conditions are filled in the same time, all the requests will be aggregated into one and functionality remain same - data will be posted on server.
Posting data to leaderboard
Since SDK in ver 3.1, there is possible to quick push of data into leaderboard via helper function Garter.I.PostToLeaderboard (eventNameId, absEventValue);. By calling the function, value of specified event is being updated and posted to leaderboard. This function is handy e.g. at the end of a brain game.
If you update a game with older SDK, see Best practice section described above.
_________________NOTE to decimal data type: decimal data type is used despite its size requirements due to requirement for high accuracy of saved data. Beside it, high accuracy is also required by protection mechanisms for data manipulation over tools adjusting values in RAM memory.
3.4. Items property management (shop)
There is no need to keep state of game items and take care about ways to save or synchronize them. This is made automatically on background by SDK item manager (shop).
- Items configuration: Items definition via section 2.1/8 (Game side configuration / property and extensions by 2.3/2 (Server side configuration / Items configuration) section.
- Every user starts game with default data (according to items state configuration)
-
User can interact with items (unlock them without sufficient experience, buy them and upgrade them) via shop generated by SDK.
Call to open shop: Garter.I.OpenSdkWindow ("shop");.
In a case of change, data are synchronised on closing the shop (returning to the game). - Current value of item properties always available by methods described in points 3.5, 3.6 and 3.7. → do not save values of items to own variables, use SDK data layer as a native source of game items data.
3.5. Getting property info
Item properties are read-only values. You can get a value, whether an item is available and in what force. Changing items state and propery values is via gamearter shop GUI.
-
Item availability: bool itemIsAvailable = Garter.I.ItemAvailability (string itemStringId );
- itemStringId = itemName defined in 2.1.8 (Game side configuration).
- true = item is available for the user
- false = item is not available for the user
- itemStringId = itemName defined in 2.1.8. (e.g. weapon1, car1...)
- property = item property defined in 2.1.8. (e.g. force, speed...)
- Returns, whether an item is available for the user.
ItemPropertyValue:
Method for asking current property values of the item.
float itemPropertyValue = Garter.I.ItemPropertyValue (string itemStringId, string property );3.6. Working with slots
Slot = string array filled by StringItemIds.
-
Get slotsstring[ ] slots = Garter.I.GetSlots();
- Returns all slots.
- returns item attached to slot with index slotIndex.
- returns "-1" if looking index exceeded slots length.
- Returns array index of itemStringId item in slots
- Returns -1 if looking itemStringId is not attached in any slot.
- Replaces slot at index slotIndex by item itemStringId.
- If itemStringId is not fileld, item at slotIndex is cleared and slot remains empty.
- Returns -1 if itemStringId is not defined, or index exceeded slots length.
Get Slot string stringItemId = Garter.I.GetSlot ( int slotIndex );
GetSlotOfItem int itemSlotIndex = Garter.I.GetSlotOfItem ( string itemStringId );
Set slot Garter.I.SetSlots( int slotIndex, string itemStringId);
Add slot Garter.I.AddSlot(); Allows to exceed slots space from a game (exceeding slots space via this function is for free). Exceeding for currency is planned via shop. (will come in next updates).
3.7. Working with Accessories
Accessories are made in a single key-value form. stringItemId is key for which you can set any string data. Example:
- key = "car1", value = "engine2-wheel4-transmition2-color6"
You can get value of item accessories as well as update value of the item accessory.
- Get item accessories: string itemAccessories = Garter.I.GetAccessory( string stringItemId );
- Set item accessories: Garter.I.Accessories( string stringItemId, string fullItemAccessories );
3.8. Saving data
Data are being saved automatically in a certain periode defined by time and game-data-layer updates.
- SDK allows folowing extension of automatical saving:
-
Possibility to save some individual data out of schemas | Data are managed and accessible by events and items schema by default. If there is need to save some data out of the schemas (e.g. user customization or so), this can be done via IndividualDataManagement.
- Explanation: Individual data are saved as a string. If you need to save more complex informations, you need to convert data-arrays and data-objects to a string. Creating and parsing of such data-formats is over a class which defines structure for transfering such object from and to json-based-string. Check how to create such class in LiteSDK mode - point 3.2 - Creating data structure.
- Saving individual data | Garter.I.SetIndividualGameData< dataType >("key", data);.
Once string-data-format is created, you can post it to be saved by this call. See point 3.3/1 of LiteSDK mode how you can create stringDataObject. - Getting individual data | Garter.I.GetData("key");
individual saved data are accessible via call. Returned data are in a format you sent them. If you want to get data filled in GameArter_Initialize object, use key "default".
-
Possibility to save data on request | In some situation, you can consider immediate save as a necessray. It may be e.g. after indvidual saved data update. In such case, you can save data by calling.
Garter.I.PostDataManually();
3.9. Game progress
SDK allows three types of counting game progress. Their configuration was in game-side configuration (section 2.1). No matter what type you have selected (if your game contains a tracker of progress), the progress value must be saved in SDK. Only this way, a user can see all games he is active in at his profile.
Game progress is in number set < 0, 100 > (in percentages). Do not use values 0-1 from a reason of float accuracy.
- Getting user's game progress | float userPgrogress = Garter.I.UserProgress();
Returns value of progress as float.
If you do not have own GUI for displaying user's progress, you can use default prefab GameArter_DashBoard.
If your progress mode is "SDK", the progress is counted automatically on basis of achieved badges. (2 badges of 10 = progress 20%). - Setting user's game progress | Garter.I.UserProgress(float absProgress);
If the game uses individual progress mode, you must inform SDK about current user's progress.
3.10. Ads
Ad types
- Interstitial ads = fullscreen ads (Available on Web, Android)
- Rewarded ads = interstitial ads with a reward for watching (Available on Web, Android)
- Banner ads = ad banner unit in certain place on the screen (Available on Android)
Ad types can be combined in a game (One game can use all 3 types of ads)
Fullscreen (Interstitial) ad
Request:
Garter.I.RequestAd(adUnitId, (optional)callback);
Rules for displaying Interstitial ads
- Request ads only in suitable places. Ads cannot affect best user experience (UX) from playing games
- Request ads in any suitable place for ad
- Game sounds MUST be muted during an ad
- Any exhortation or rewards for interacting with ads is prohibited
Best practices for interstitial ads
- First ad call from the start of the game. An ad at the beginning of the game does most of the income (the highest number of views). GameArter ad manager works with 2 types of preroll ads. In a case, that a website does not have own preroll, GameArter ad manager displayes an preroll ad on a load of gameplayer. In such case, first ad call from game is ignored. If no preroll on load of gameplayer is displayed (because it is not possible or is disabled), an ad on first ad call is displayed (= replacement of the preroll ad). From that reason, insert first ad call always at the beginning of the game.
- Call ads in every suitable place. GameArter's ad manager contains a layer which filtrates ad requests to achieve the best ratio between number of displayed ads and user experience.
How ad requests work
- ad request is received in GameArter Ad manager.
- GameArter Ad manager checks availability of ads and processes ad-frequency-check.
- If suitable ad was found, GameArter Ads manager displayes an ad.
Adblock ads behaviour
In a case of active ad blocking in user's browser, GameArter runs affiliate ads instead of classic ads.
Ad configuration for individual websites
Ad configuration for individual websites where the game is published is visible in Reports section after release of the game. There you can find out preroll ad type, frequency of ads, maximum length of ads, ad providers and so on. GameArter uses a mix of ad providers including own ads due to cover all websites restrictions (mainly policies for displaying Google Ads and ads.txt standard) and for achieving the best possible CPM. If you would like to make a change in default settings for a certain website or your game, contact GameArter support.
Implementation
Ads can be implemented either with or without callback, preferred way is up to a developer
- With callback - SDK provides callback about current state of an ad
- Without callback - SDK manages game behaviour during ads automatically based on configuration in "ServicesAdjustments.cs file" file.
Implementation without a callback
If no callback in ad request is found, GameArter mutes a game (on displayed ad) and unmutes (on completed ad) game automatically. This behaviour is set and may be adjusted (if default solution does not work properly in the game) via ServicesAdjustments.cs file (mentioned below).
public class AdCallExample : MonoBehaviour {
	Garter.I.RequestAd (adUnitId); // request an ad.
}
Where adUnitId is unit id defined in step 2.1.12 - ads definition
Issues prevention
- Do not call ads in a time game sounds is being initialized. If you do not want adjust ad configuration for muting / unmuting game in ServicesAdjustments.cs, be sure you do not call ads before or during a time when game sounds is being initialized. If any sound loads after the ad request, ad manager is not able to mute it. In this case, ad implementation is not valid. Always verify in the editor, that all sounds are muted during a box illustrating an ad.
Configuration of game behaviour during ads
Adjust it only if it does not work in your game (something is wrong while you see UI "Ad is being displayed"), or you can improve it. Make the change inside Assets/GameArter/ServicesAdjustment.cs. On end of an ad, function "AdClosed()" (located in the same class) returns the game back to the state before changes made by "AdOpened()" (CacheCurrentSettings ();). If you adjust function AdOpened(), you must adjust function "AdClosed()" as well.
SDK works with sound, timescale and pointer by following way:
// ServicesAdjustments.cs file
public void AdOpened(){
	CacheCurrentSettings (); // cache current state - game will be returned to this state after clossing an ad (=mute game)
	// mute the game sound
	AudioListener.volume = 0f;
	//set minimum timescale to improve ad performance
	float minimumTimeScale = Garter.I.GetMinimumTimeScale ();
	Time.timeScale = minimumTimeScale;
	if (minimumTimeScale == 0) {
		AudioListener.pause = true;
	}
	// display mouse pointer (unlock cursor)
	if (Cursor.lockState != CursorLockMode.None) {
		Cursor.lockState = CursorLockMode.None;
	}
	if (!Cursor.visible) {
		Cursor.visible = true;
	}
}
Implementation with a callback
If a developer prefer setting game behaviour during ads on his own, he can deal with it via used callback function.
Callback states
- ignored = ad request has been ignored. Probably due to not enough interval from the previous interstitial ad
- pending = GameArter is checking availability of an ad
- loaded = An ad has been loaded. Game sounts must be muted
- running = An ad is running
- completed = An ad has been completed Game sounts must be unmuted
- failed = something went wrong Game sounts must be unmuted
public class AdCallExample : MonoBehaviour {
	Garter.I.RequestAd (adUnitId, (state) => {
		if(state == "loaded"){
			// MUTE GAME
		} else if(state == "completed" || state == "failed"){
			// UNMUTE GAME
		} else {
			// ... do nothing
		}
	});
}
where adUnitId is unit id defined in step 2.1.12 - ads definition. Be sure that game behaviour is in accordance with the terms for displaying ads.
----------------------------Note (if you need...)
Ads may be set differently or updated dynamically for every website / platform. Especially minimum time interval for displaying ads. This value, together with minimum time to next ad (both in seconds) you can get from SDK by the way mentioned below. Possible use case is e.g. for setting own ads in a loop.
public class AdCallExample : MonoBehaviour {
	Garter.I.GetAdConf ((conf) => {
		SdkDebugger("Garter.I.GetAdConf ((conf) => {})", ("Next ad in "+conf.nextAdM.ToString()+"s. Minimum time between ads "+conf.meantimeM.ToString()+"s."), "returns ads configuration.");
			});
}
Note, that getting ad configuration must be tested. On basis of internal tests, unity does not return callback function of this type immediatelly, but after a user interaction (click) -> (Unity gets focus). This says, that working with Garter.I.GetAdConf() may be very hard e.g. in driving games where users do not do any clicks during gameplay.
Rewarded ad
Availability of a rewarded ad is individual based on user's behaviour. Display button / option to launch rewarded ad only if the rewarded ad is available.
Rewarded ad can be called only with defined callback function
Callback states
- ignored = ad request has been ignored. Probably due to no ad (be sure you check ad availability before requests!)
- pending = GameArter is processing the request
- loaded = Rewarded ad has been loaded. Game sounts must be muted
- running = The ad is running
- completed = An ad has been succesfully completed. Release reward + unmute sounds
- failed = something went wrong - user canceled the ad unmute sounds without reward
Implementation
public class AdCallExample : MonoBehaviour {

	if(Garter.I.RewardedAdAvailability()){
		// display button / UI for requesting rewarded ad
	}

	// On rewarded ad request from user (e.g. pressing rewarded ad button)
	Garter.I.RequestAd(adUnitId, (state) =>
   {
	    if(state == "loaded"){
			// MUTE GAME
		} else if(state == "completed"){
			// UNMUTE GAME, RELEASE REWARD
			// HIDE BUTTON FOR REWARDED AD
		} else if(state == "failed"){
			// UNMUTE GAME
			// HIDE BUTTON FOR REWARDED AD
		} else {
			// ... do nothing
		}
	});
}
where adUnitId is unit id defined in step 2.1.12 - ads definition. Be sure that game behaviour is in accordance with the terms for displaying ads.
Note: rewarded ad availability is driven by ad network. Because editor is not connected with any ad network, returned rewarded ad availability state is always false.
Banner ad
where adUnitId is unit id defined in step 2.1.12 - ads definition
3.11. Analytics
Why and how to use analytics? And how to track data? Check Analytics waltkhrough.
From the simplicity and functionality, we use classic Google analytics for tracking games. Google analytics tracks automatically all basic data, for more detailed data, the analytics allows to create own events and segments. Playability, time in game and other basic metrics are tracked automatically. However, if you want to make really good game, you need track more matrics, than just the general. Via Analytics module, you can send any information to analytics you want in a form of event. See google documentation of events:
Send any information you want to analytics by call:
Garter.I.AnalyticsEvent(string action, string category, string label, int value);

/*
where:
category, label, value are optional parametres
See more at: https://developers.google.com/analytics/devguides/collection/analyticsjs/events
*/
3.12. Fullscreen
Because of other services around a game, fullscreen mode must be called over GameArterSDK. Attach following call to fullscreen button in your game (if your game has such button). If a game is already in fullscreen mode, fullscreen is cancelled by the call.
Garter.I.Fullcreen();
Fullscreen must be initialized on Pointer down event.(Event trigger).
3.13. Redirects / Branding
SDK contains a solution for working with brands and making redirects (opening new tabs / windows). Branding and redirects must be made via SDK for two reasons:
-
Displaying right brand
SDK contains a multi-brand solution. In short, this feature allows to display all in-game logos on basis of a website the game is displayed on. Changes of outgoing links are also included. This feature is active for websites which promote games from GameArter system. With gameater promotion, there should be more gameplayes and higher incomes. Logos are downloaded at the beginning of the game.
-
Opening pages from a game
A browser pop-up blocker blocks all requests which are not initialized in a certain time from user's action. This applies for all JavaScript requests called from games. SDK contains a solution, which reduces the time between clicks and opens new tabs without hit of the pop-up blocker.
-
Tracking redirects
With our solution you will know about every made redirect. - From what logo, on what website, and how oftenly is being used.
2 Ways of implementation:
- Implementation via prefab
Prefab Individual_logo in Prefabs folder (Assets/GameArter/Prefabs) - A solution for placing own logos containing redirect links into your game. Option Individual requires placing own 2d texture as a button image and a link the logo will redirect. All redirects are opened as a new tab. 1) this does not destroy user's experience and 2) sites like app store or google play do not support opening in iframes.
If you want to have more individual logos in the scene, simply duplicate the object and change logos and links.
- Implementation via code:
Use function Garter.I.OpenWebPage (string targetURL);
This callmust be initialized on POINTER DOWN event. You can listen for this event via EVENT TRIGGER or via following code:copy// where gameObject is your target object for listening EventTrigger et = gameObject.AddComponent< EventTrigger > (); EventTrigger.Entry entry = new EventTrigger.Entry (); entry.eventID = EventTriggerType.PointerDown; entry.callback.AddListener((data) => { OnPointerDownDelegate((PointerEventData)data); }); et.triggers.Add(entry);
3.14. SDK loading screen
SDK contains pre-created loading screen asset in GamePlayer design. Its purpose is to save time, if your game does not contain such screen yet. This screen can be used e.g. during loading maps and other assets.
Using of loading screen:-
1) Creating loading screen |
Garter.I.CreateLoadingScreen (string assetName, texture assetImg, bool activeProgressBar);set activeProgressBar to false, if you do not want to send current time of progress to the loading screen. The bar will be hidden.
-
2) Updating loading screen | Garter.I.UpdateLoadingScreen (float progress);
If you set activeProgressBar to "true" during creating the loading screen, this is a way you can send update to the progress bar by current state of progress. 0 = 0%, 100 = 100%
-
3) Removing loading screen | Garter.I.RemoveLoadingScreen ();
Once the asset is loaded, remove loading screen by this call.
// insert this script to an object placed in scene Hiearchy
public class LoadingScreenExample : MonoBehaviour {
public Texture mapTexture = null; // public var for attaching texture
int updateLimit = 1001; // for test
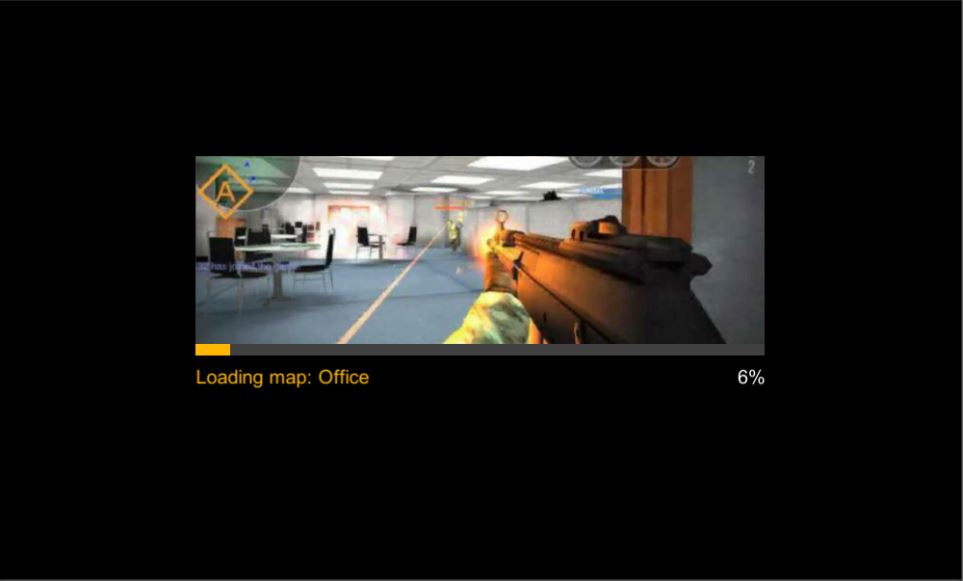
public void LoadAssetScreen(){
Garter.I.CreateLoadingScreen ("Loading map: Office", mapTexture, true); // create loading screen
updateLimit = 0; // set progress of loading screen to 0
}
void Update(){
updateLimit ++;
if (updateLimit < 1000) {
Garter.I.UpdateLoadingScreen (updateLimit / 10); // set current progress of loading
} else if (updateLimit == 1000){
Garter.I.RemoveLoadingScreen (); // asset loaded - remove loading screen
}
}
}
3.15. SDK cutscenes module
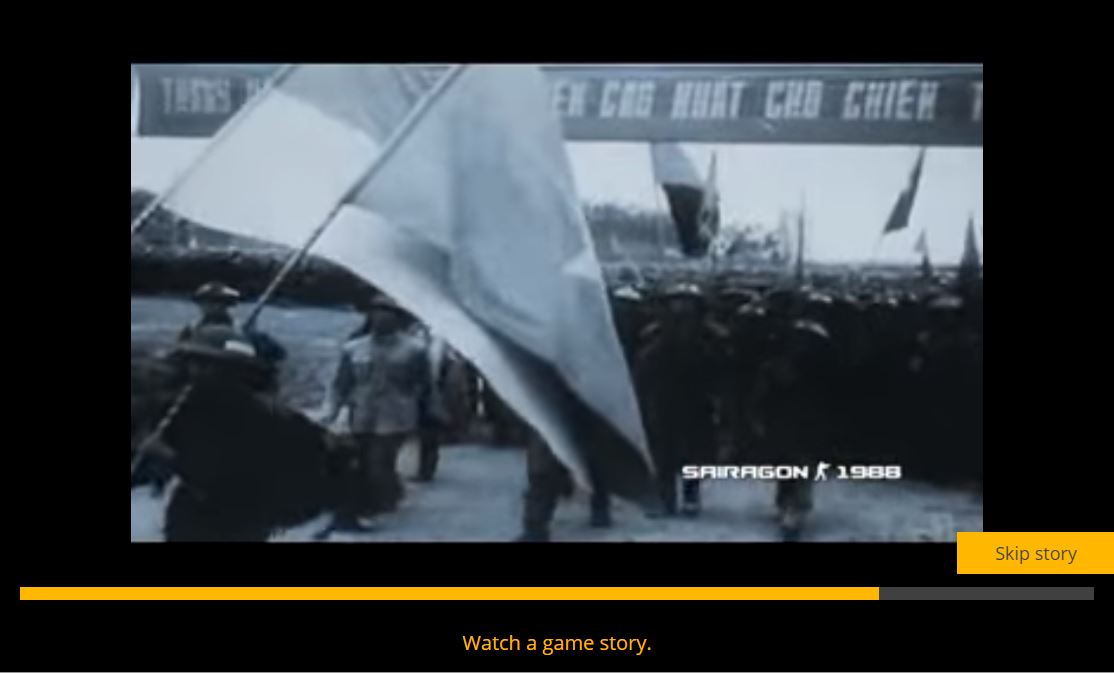
Every game contains many data-weight cutscenes, stories and animations which are displayed calmly only one time for the whole game. GSDK helps to reduce game filesizes by providing a story module — an option for downloading these stories from external storage only in a time when it’s required. Dynamic loading of game stories might be done via asset bundles or this SDK feature when the story is displayed in gameplayer above the game (like an ad).
-
1) Calling browser stories | Garter.I.RunStoryAnimation (int animationNumber);
By calling this, the game is automatically muted (via ServicesAdjustment.cs) and the animation (story) launched. Be sure that animation of such number is available for your game.
-
2) Callback in the end of animation
Once animation ends, there is a callback to ServicesAdjustment.cs file. By default, the game is unmuted via the class. You can find more about this class and its features in point 4 - Advanced features. If you customize behavior during opened modules from default behavior, be sure that sounds are muted for during story module (moduleName == "storywindow").
- 3) Setting / switching of stories
Is being made in "More" section of configuration of the project

3.16. Login during a game
If there is a log-in during a gameplay, SDK automatically calls function Initialized() inside Class GarterLiteCallbacks. The purpose of the function is forward the received data to developer's function via which he sets default user's data for game. It means, that once these data are received, old data are rewrited by the new incoming data. Be sure, this functionality remains preserved (See 3.2 SDK Initialization).
3.17 Game as App
Feature available since SDK version 2.2
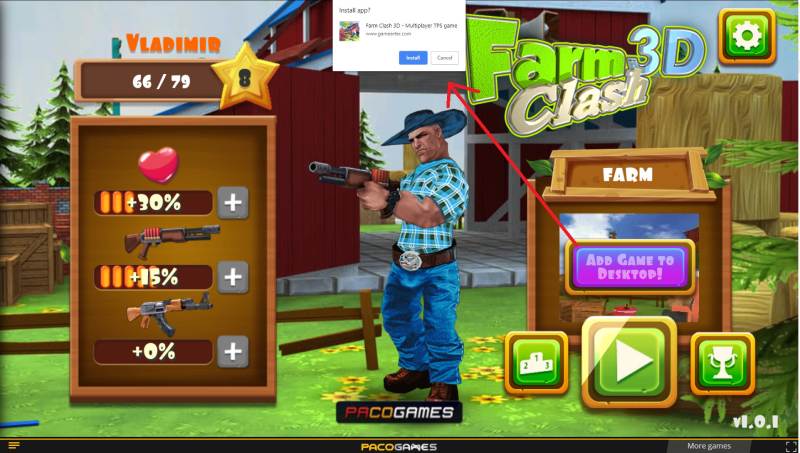
GameArter SDK allows to installation of web games as Web Apps to user's device. Installation is possible to PC as well as mobile device.
Implementation
- NOTE: this feature is functional after submiting requests for publishing in GameArter.
- Icon of web app (displayed at user's screen of desktop / mobile) must be in .png format and in 2 dimensions - 192x192 & 512x512px. Name them "favicon-192.png" and "favicon-512.png" and attach to folder "_pwa". Upload this folder with other project files in "Files upload" section at GameArter panel.
-
1) External callback listener | Garter.I.AddExternalCbListener("PWAState", targetFunction);
The listener is used for setting visibility of button "installing game as app". Design of the button is up to developer.
copyGarter.I.AddExternalCbListener< string >(Garter.ExternalListener.PWAState, InstallAsAppButton); function InstallAsAppButton(state){ switch(state){ case "enabled": // Display button break; case "disabled": // hide button break; } }Button must be hidden in default.
- Next option, e.g. when a user comes to menu and there is not known state in the game →
Get current state value | Garter.I.GetStatePWA()
Returns "enabled" / "disabled". See point 1. -
2) Request for instalation
Request for adding game as app to user device is made by user's click at button "installing game as app". Returned state identifies about current state of installation. These states maz be sent to e.g. analytics for tracking click ratio.
copybuttonAddAsApp.onclick = InstallGameAsApp; function InstallGameAsApp(){ Garter.I.InstallAsPWA< string > ((state) => { switch(state){ case "rejected": // request is rejected. Be sure the request is posted only if Garter.I.GetStatePWA() === "enabled". break; case "dismissed": // user cancelled the request break; case "accepted": // user accepted the request break; case "installed": // game was succesfully installed as app break; } }); }Visibility change of button during these states is driven via listener for "PWAState", see point 1.
4. Advanced features
Additional features are features which are not necessary for running of a game in the system. These features are for customization of game behavior. Via informations in this section, you can rewrite default behavior of the SDK.
Do not work with this, if you do not understand them.
4.1. Working with GameArter modules
WebGL games are running in a GamePlayer supplemented about modules. These modules maight be opened by user's direct action or by a call from a game. There is also possible to customize game-behavior during the time modules are being opened. There is possible to open all the modules also from gameplayer, so inserting them to the game is purely optional.
-
1
Opening GameArter web modules
GameArter modules can be opened from a game by calling Garter.I.OpenSdkWindow (moduleName);
List of GameArter modules- Login Garter.I.OpenSdkWindow ("login");
Opens login window. Login window is automatically called by the SDK at the beginning of a game (if a user is not logged in already). SDK opens login window also after pressing log in button in GameArter_Features prefab. Use this call only if a user is not logged in (check via .IsLoggedUser()) and by your own environment.
- Badges Garter.I.OpenSdkWindow ("badge");
Opens viewer of all badges available in the game. Received badges are visibly separated from other badges.
- Leaderboard Garter.I.OpenSdkWindow ("leaderboard");
Viewer of leaderboard state is being in progress, but you can add these calls already now. A user will be informed, that it will come soon. Once leaderboards viewer will be ready, it will begin work automatically.
- User's web profile Garter.I.OpenSdkWindow ("profile");
Opens user's web profile. This is the place a user can change his nick, image, or log out.
- Share Garter.I.OpenSdkWindow ("share");
Opens sharing window via which a user can share the game.
- Shop / Item manager Garter.I.OpenSdkWindow ("shop");
Opens item management / shop.
- Discussion Garter.I.OpenSdkWindow ("discussion");
Opens a discussion.
- Bug reporting Garter.I.OpenSdkWindow ("report");
Opens box for reporting bug or any other feedback.
- Development Info Garter.I.OpenSdkWindow ("development");
Opens module with informations about development. This is place with informations about game updates. Such a small blog. There can be polls and so on.
- Video Garter.I.OpenSdkWindow ("video");
Opens box with a video. Videos to the module maight be added via GameArter.com website.
- Game infobox Garter.I.OpenSdkWindow ("gameinfo");
Opens a window displaying game controls and Developer informations.
- More games | Garter.I.OpenSdkWindow ("moregames");
Opens window with other recommended games to play.
- Login Garter.I.OpenSdkWindow ("login");
-
2
Customization of game behavior during opened modules
By default, a game is muted during opened modules. If you want to individualize behavior of your game during opened modules, it have to be done over ServicesAdjustment.cs (Assets/GameArterServicesAdjustment.cs) script. This script contains function "ModuleWindowOpened()" and "ModuleWindowClosed()".
copypublic class ServicesAdjustment { public void ModuleWindowOpened(string moduleName){ // module was opened - cancel mouse lock, make pointer visible, set low timescale, run a music ... // this is called also during every change of a module. // Therefore, if you wark with "caching" of current game state, there is need to // save the values on first module only float minimumTimeScale = Garter.I.GetMinimumTimeScale (); if(Time.timeScale != minimumTimeScale){ // set your own value instead of 0 CacheCurrentSettings (); // save this for first opened module only Time.timeScale = minimumTimeScale; // set minimum timescale (better performance) } // on basis of moduleName, every module can have different config - e.g. different ambient music. } public void ModuleWindowClosed(string moduleName){ // return game to the initial state (from CacheCurrentSettings()); } }If you need to know, whether the game is active or not, there's req Garter.I.IsGameMuted();
4.2. Customization of game behavior during ads
During active ad, a game sounds must be muted. This is made automatically by SDK. SDK works with sound, timescale and pointer by following way:
public void AdOpened(){
	CacheCurrentSettings (); // cache current state - game will be returned to this state after clossing an ad (=mute game)
	// by this way, the game is muted
	AudioListener.volume = 0f;
	float minimumTimeScale = Garter.I.GetMinimumTimeScale ();
	Time.timeScale = minimumTimeScale;
	if (minimumTimeScale == 0) {
		AudioListener.pause = true;
	}
	// mouse pointer
	if (Cursor.lockState != CursorLockMode.None) {
		Cursor.lockState = CursorLockMode.None;
	}
	if (!Cursor.visible) {
		Cursor.visible = true;
	}
}
Adjust it only if it does not work in your game, or you can improve it. Make the change inside Assets/GameArter/ServicesAdjustment.cs. On end of an ad, function "AdClosed()" (located in the same class) returns the game back to the state before changes made by "AdOpened()" (CacheCurrentSettings ();). If you adjust function AdOpened(), you must adjust function "AdClosed()" as well.
5. Testing
Start your game. Most SDK services is available also in Unity editor. Before upload, there is need to check:
- Functional communication with server.
The game has an access to server and can posting and getting data. If you need to clear all posted data, you can make it via button Clear user's game data in GameArter_Initialize object.
- Events, currency etc. are set and work properly
You do not have a mistake in working with events. Events contain right values. Badges are returned in the right time.
- When a module is opened, the game has righ behavior on behind. Game must be muted with visible pointer during ads.
- All work as expected
6. Upload to GameArter
6.1. Uploading files
- Two ways to upload files
-
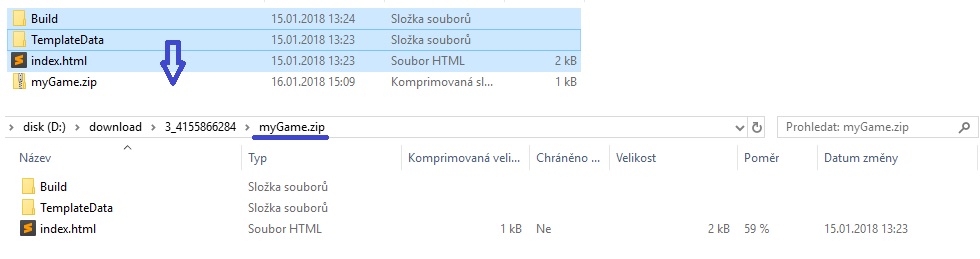
Zip package.
This way is supported in all browsers. Simply wrap all your build files to .zip format. A program allowing creating .zip files is in most systems by default. If you do not have any in your pc, you can look e.g. for WinRar.
-
Direct files.
If you sue Google Chrome, you can upload individual files by a drop and move schema. Just take file you want to upload and move it into the grey area.
-
Zip package.
- Files intended to be dynamically loaded during gameplay
There's always huge benefit to keep basic filesize as small as possible (see the importance of loading time). There is collection of files which do not need be loaded in significant percentage of game launched, or e.g. directlz from the beginning. For such file, tehre is recommended to use dynamical load in a time when they are needed.
Dynamical load may be applicated for any type of assets - cars, maps, sounds, textures.
- Assets must be uploaded to GameArter, directly inside or in any sub-folder inserted in Build folder. E.g. Build/Textures/...
- Loading this assets is then possible via relative path "Build/...", e.g. "Build/Textures/...". Relative path guarantee that the game will be alsoways load all the files from right place in right version.
- In a case of any problem or required consultation, contact Vladimir.
6.2. Adding game on GameArter
Log in to you account at GameArter - https://www.gamearter.com/. At gamearter, go to the game project and press "upload game files" button. Fill boxes and attach game .zip file. By "test now" button, you can look whether the game runs properly. If you think that your game is ready, change its status to "Published". Once this is done, save the game.
6.3. Setting GamePlayer
In a tab GamePlayer you can customize gameplayer. You can fill there game description, controls, links to social sites, add images for game loading time and so on.
7. Game releases
Managed by "Publication" section of a project.
Be sure that you enabled caching option in build settings.
7.1 First release
Once the game is ready to release, you can get a public link for free spreading in the "Publish" section of the project after pressing "Publish now button". In this case, game is automatically fully set and you can start share the game with players. In one working day since release, GameARter also will make additional check of the game and its functionality. Once the game is checked, you will be informed about result on Slack or email. If all is ok, the game will be sent to hundreds of webmasters in the system. Next day after release, the game will be displayed in reports sections of GameArter dashboard.
Important note: Once you press publish now button, the game passess from "testnet" to "release" state. In a case that your game is connected with GRT currency, any updates of events / items / packages will be visible in the game after confirmation from a side of administrators. This is a protection from manipulation with prices and affecting value of GRT token. Therefore be sure you are requesting release state when you are sure you will not update your released version of game. For testing next updates before release, you can use testnets where you can still edit all the items without any limitation.
7.2 Game updates
Game updates are fully managed by developers via Publication tab in project environment. (Project section at GameArter). After pressing "Publish now" button, previous game version is replaced for a new game version automatically. By every update, GameArter changes files location to prevent running old versions from cache. GameArter also keeps 1 old version for option to return back in a case of any found issue.
Updates are instant, there is no approval by GameArter. By this action, developer takes full responsibility for the update so be sure the new version works well.
All updates are tracked by GameArter. GameArter's staff check all updates in few hours after update to prevent potential problems.