Before you start
Estimated time of SDK implementation: 20 minutes. Please, follow the guide carefully, it will save you from many future problems.
1. SDK configuration
Before a possibility to connect to the SDK, there is need to make a project configuration.
1.1. Create a project
Create new html5 game project in projects section of GameArter system.
This is way you will get your project Id for communication with GameArter SDK.
1.2. Project configuration
Create a configuration for selected project version. You can have up to 5 versions of every project. (Only 1 version can be live, the other 4 serves for development purposes or AB testing).
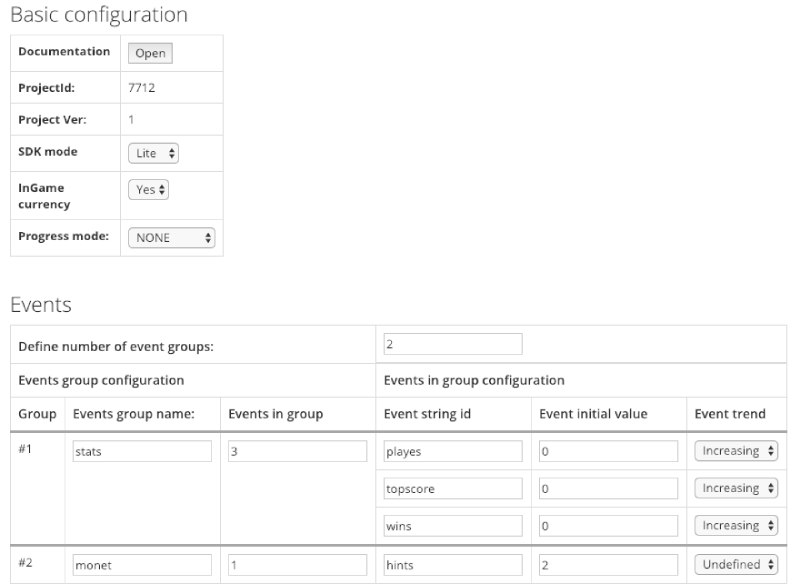
-
1
Documentation
A button opening knowledge base you are currently at. -
2
2.1 Project ID
Every project must have own unique ID. Project ID is a signature needed for communication with GameArter services. You got this id during creating your project in projects section of GameArter system. (point 2.1)
2.2 Project Version
For possibility of testing, GameArter provides to run up to 5 game versions. Every version has separated configuration and databases.
-
3
SDK mode
The mode, under which the SDK will run. Select Lite. -
4
InGame Currency
The game uses own currency which will be exchangeable into global GRT (native IAP support). Select No. -
5
Progress mode
SDK allows three types of counting user's game progress. Value of user's progress must be always saved in the SDK. This information is needed for displaying game info (progress, badges...) in the user's profile.
Current progress state can be displayed also in the game. If the game does not contain GUI for this value, there is possible to display user's progress with other user's data over GameArter_DashBoard prefab. If you want to use GameArter_DashBoard prefab, but without progress bar, switch its visibility to state "hidden".
- SDK | progress is being counted on a basis of received badges. (2 badges of 10 = progress 20%). You can display the progress in your own GUI, or via GameArter prefab GameArter_DashBoard prefab. If you want to use GameArter_DashBoard, but without the progress bar at the bottom, you can switch options of SDK Progress bar.
- Individual | SDK does not count progress, only holds its value. There is always need to send changes of user's progress into the SDK. Progress can be displayed in your own GUI, or via GameArter_DashBoard, see the point above.
- None | A game does not contain progress feature.
-
6
Smart Events
Before implementation, please read and try to understand Events purpose - In-game currency distribution. According to the event specification, make a plan, which game data will be saved as events and which as a different type of data.
Event explanation
Examples:
Event is an important variable connected with a feature (leaderboard) or a reward (achievements, currency reward), or with a shop for direct in-app purchases. Event example: kills in a shooter game , lap time in a racing game, number of gints in a logic game... Value of event can be increasing, decreasing or without defined trend. Events with defined trend can have attached unlimited number of badges on every event. There can be active also leaderboard above these events. Events with undefined trend are designed for direct connection with in-game shop. There is a possibility to work with events in many ways, events are written generally to allow anything a developer may need.-
"kills" event = total number of kills in a game
Initial value is 0 (new player). The number of kills can only grow in a time (= event with increasing trend). There will be a leaderboard connected with the event (most kills in the game). There will be badges - 1st kill, 10th kill, 100th kill... Leaderboard and badges are made and distributed by SDK. Developer only needs to keep best "kills" value in events = update the event with every kill. Required "kills" value for events is set on server (point 2.3). Then, once the value of the event will achieve the value of a badge, SDK will reward the badge to a user automatically. If a user sends a request to see a leaderboard, the SDK will create the leaderboard by comparing "kills" values of all users in the game. -
"bestLapTime" event = the lowset time achieved in a lap
Initial value is any not-null number. E.g. 120 (secs). Lower time is mostly better (= event with decreasing trend). There is a leaderboard for the time in the lap (made by SDK on basis of the best time of all users who completed the lap). There are 3 badges for the lap - gold / silver / bronze time. At the end of every lap, the developer checks time saved in the event "bestLapTime" and if current time is better (lower), he updates best achieved time in the lap. -
"maxAchievedMoney" event = a special help event allowing give own badge
This is a special event allowing to give a badge on basis of a dynamic variable. E.g. there is a need to add badges "Earned 1st dollar" and "Millionaire". The badges are connected with a currency which has dynamic value changeable in both directions. Then, if currency value will achieve a specific milestone, you can update event "maxAchievedMoney" and a user will be rewarded by a badge. -
"hints" event = number of available hints for a player.
Let's say a logic game will not contain any in-game currency, badges or leaderboards. All required functionality is implementation of in-game purchases. A user has certain number of hints to use (either one-time only, or every day) and in a case of need, he can buy more for GRT currency via native GameArter shop system.
Another possible event use-caseInitial values of events are changeable in web environment as well. Thanks to this option, events can be used also for game testing - If you set e.g. items to be unlocked on basis of some event value, you can unlock them directly from server without need of game rebuilding.
Define number of event groups | set number of groups in which you want to have events divided (better clarity)Event Group name - name of a group of eventsEvents in group - number of events in the group- Event string id | ID name of the event. Name in lowercase letters, without spaces. this is string ID over which you will get and set values for the events.
- Event Initial value | initial value of the events. (probably 0 for increasing trend). Any number > 0 you consider as optimal for decreasing trend. Any number >= 0 for undefined trend.
- Trend | select, whether the event has increasing trend (value number is better (kills), or decreasing (lower number is better (best time of the lap), or undefined (value can be changed via in-game shop - e.g. number of hints)
-
"kills" event = total number of kills in a game
Remember you projectId and Project Ver for next steps. Once done, save the basic configuration by pressing "Save configuration"
1.3. Services configuration
Services configuration is for files management, project versions management and adjusting data filled in the project configuration and for adding additinal SDK features as badges, leaderboards and in-game purchases. Services configuration is manageable via the project panel. Project configuration is still available for option of updates under button "Export conf".

- Rows / Buttons explanation:
- Version ID | project version
- Last modified | Last modification in the version configuration
- Version State | project mode - testnet / production
- Interpreter | interpreter under which the project version runs
- Config status | Status of data state - draft / pending (= waiting for authorization by admins) / live (= approved,in production)
- Export conf buttonn | Opens project configuration (panel 2.2)
- Events button | Opens events configuraion (= rewards, badges, leaderboards)
- Packages button | Opens packages configuraion (= ingame purchases)
- More button | Opens configuraion of additional features
- Saved data button | Opens environment for reading / changing data of logged (developer) account in the game
- Files upload button | Opens environment for uploading game files
- Test the game button | Opens game in a new tab
- Remove button | Removes project version
-
1
Smart Events configuration
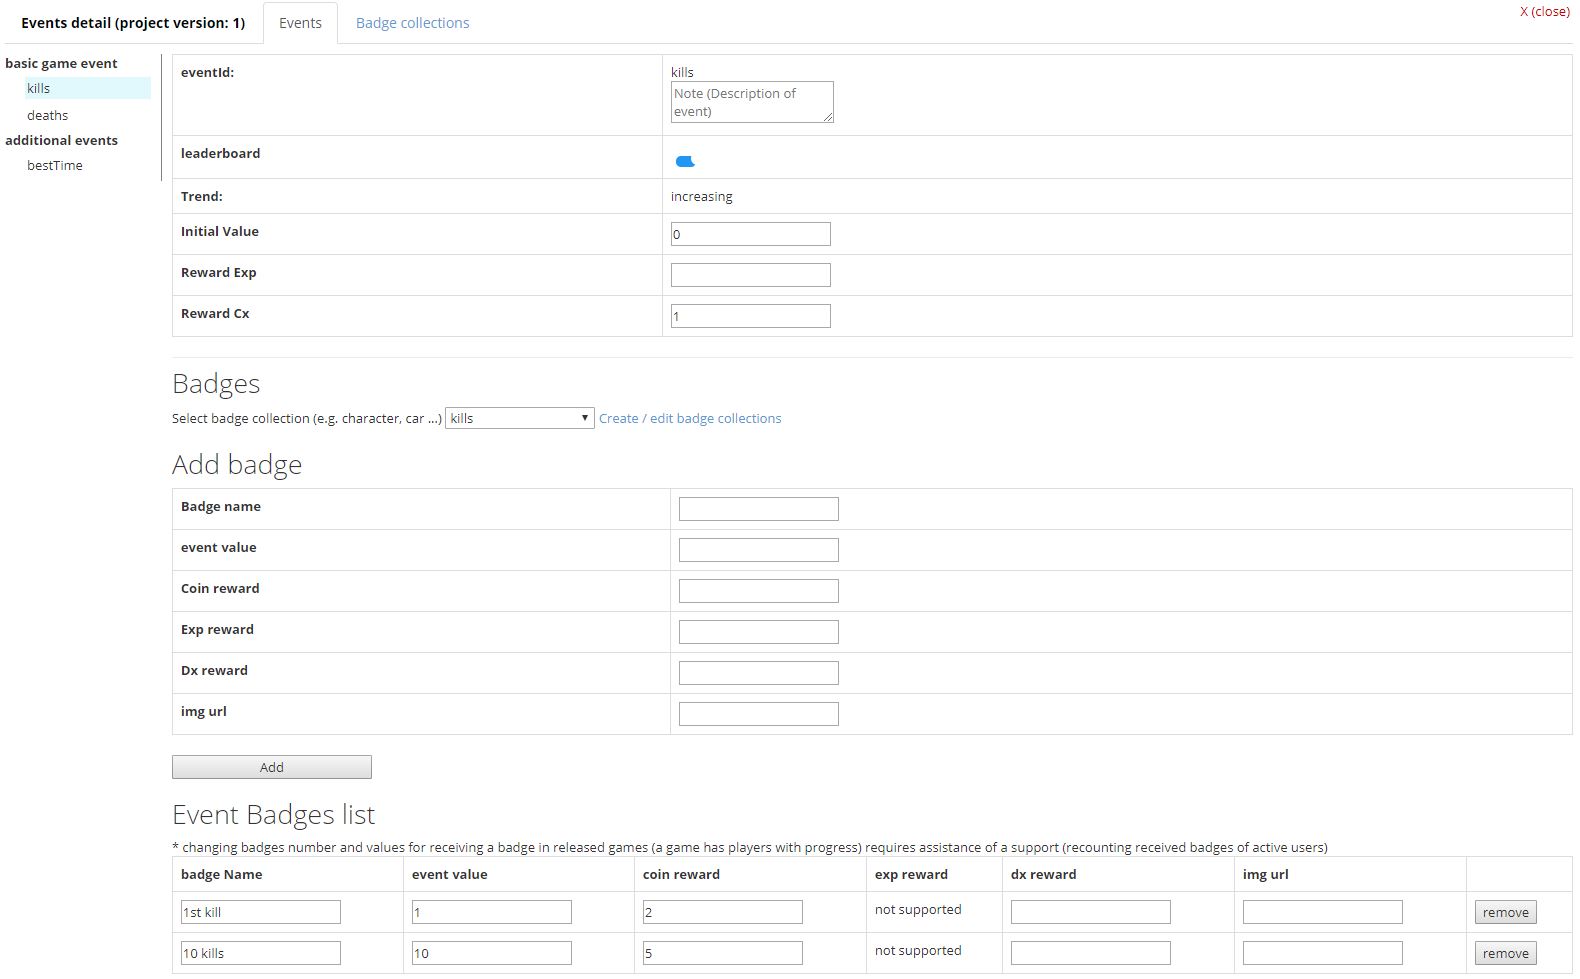
- Server-side contains all defined events. If not, contact support.
EventDetail- Event ID | non-changeable string ID. All data you will fill for the event are associated with this ID. If you change its name / remove the ID, all associated badges and leaderboards will be lost. Do not change this, if it is not necessary. If so, contact support for possibility to convert users' data below the new event ID.
- Leaderboard | Checkbox for activation of leaderboards for the event. SDK automatically creates leaderboards for the event. There are leadeabords created with filters 1 day / 1 week / 1 month / all-time. Trend of leaderboards is intended by event trend.
- Trend | Trend of event. From safety reasons, there is no possibility to manipulate with events in both directions. An event can only grow (increasing trend) or fall (decreasing trend). Usage: increasing trend - total number of kills, number of opened maps. Decreasing trend - best time of a lap.
- Initial Value | Initial value of event. By this, you can overwrite initial value set in the game. This value is returned to all new players. Default value for events with increasing trend = 0. Default value for events with decreasing trend - none, need to be set.
If availability of some item depends on a state of event value, this is way you can set the item property for new users without need of rebuilding game, directly on one click from server. - Reward Cx | Reward for occured event in a currency depending on a native game currency. (Full SDK = GRT, Lite SDK = GRT/local game coins on basis of local game coins existence). Reward is for a change about one unit. Examples:
- kill event - a coins reward for 1 kill
- lap of a round - better time lap about 0.2sec → reward per 1 unit (=1sec) = 1coin → 0.2*1 = 0.2 coin reward.
- Reward Exp | available for Full SDK mode only. Works same as Reward cx, only the reward is in game experience. On basis of achieved experience in the game by users, there is possible to automatically manage items - unlock them for using (see more in items configuration). This feature allows to create basic game design.
Add badge- Badge name | Name of a badge you want to add (e.g. 100 kills)
- Event value | Event value on achieving which the badge will be received (= 100)
- Coin reward | Received coin reward for received badge.
- Exp reward | Received coin reward for received badge. (full SDK only)
- Dx reward | Received diamonds for received badge. (rewards disabled currently)
- img url | image of a badge. Fill name of image file. If you do not have an image for the badge, let it be.
Event Badges List | list of created badges. You can adjust already defined badges here. If your game is already released and badges are rewarded, and you want to change value for a received badge, please contact support. Badges of all players will have to be recounted.
Badge Collections | Group more badges to a defined collection. Max number of collections is three. E.g. Character, car, others. Badge collections do badge listing in GUI clearer.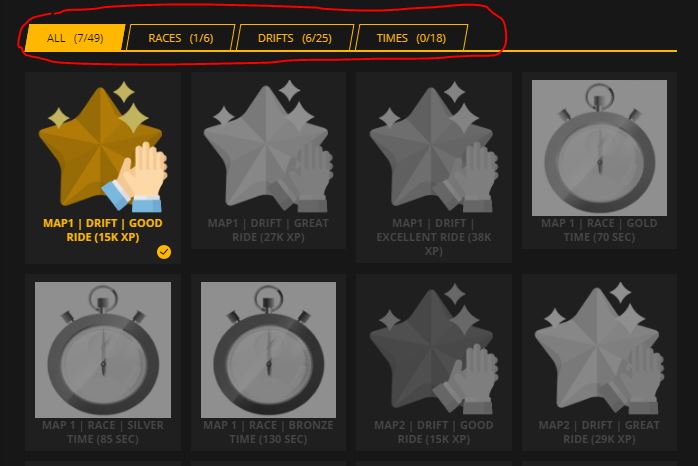
Saving events configurationFilled events must be saved. There are 2 options of saving. "Save as concept" saves the changes as a concept only - these saves are not visible from game. If you want to save the data and have access to them from a game, save them via "Save to production" button. If you do bigger changes for a project in production state "live", there is a need of approval by administrator. It is to prevent clashes which would lead to possible game crashes after changing values for badges, eventIDs and so on.
2. Getting started with SDK
At the very beginning, there is need to set basic project configuration.
2.1. Download SDK package
Download latest version of GameArter SDK Unity package from GameArter SDK for Construct section.
2.2. Import GameArter SDK package to the game project
Construct 3
- Open Menu → View → Addon Manager
- Press "Install new addon..." button
- Select downloaded GameArter's addon
- Relaunch / Reload Construct 3
Construct 2
- Unzip downloaded GameArter package for Construct
- Copy folder "gamearter" to "exporters\html5\plugins" folder of Construct 2. Usually "C:\Program Files\Construct 2\exporters\html5\plugins"
- Launch Construct
- Insert GameArter (available in "Platform specific") to requested project by "Insert new Object" option. (available after right mous button click in Layout tab.
Insert GameArter SDK into your project:
- Press right mouse button in Layout scene
- Select "Insert new object option"
- In "Platform Specific section", find and select GameArter SDK. Note, you will find this SDK there only if you do not have it selected in your project yet and you have it added in Construct.

2.3. Fixing possible errors
- Error on load on GameArter domain. Be sure you did not select minify option during game export. Minification made by construct is not compatible with external scripts. Use available tools for post-export minification and obfuscation.
- Any issue found or need a help? Let me know. GameArter Slack: @adm_vladimir / email - [email protected] /
3. Working with SDK
3.1. SDK initialization
GameArter SDK is initialized automatically. Initialization is created on basis of configuration data filled in GameArter object.
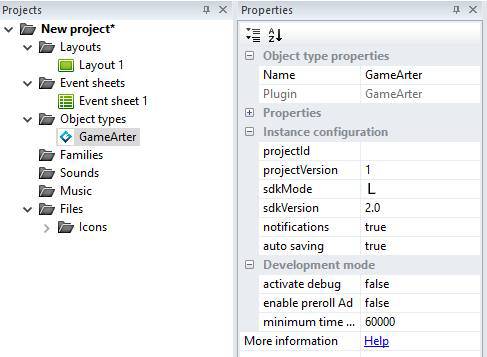
GameArter object Properties
Instance configuration
| projectId | Id of created project in point 1 | [Int] |
|---|---|---|
| projectVersion | Version of created project in point 1 | < 1 - 5 > |
| sdkMode | Selected mode of SDK | "B" (=basic), "L" (=lite), "F" (=Full) |
| sdkVersion | Version of used SDK | 2.0 |
| notifications | Enable SDK-based notifications | true/false |
| auto saving | Enable auto saving | true/false |
Development mode
| activate debug | Activate full printing to console | true/false |
|---|---|---|
| enable preroll Ad | Display preroll Ad on load | true/false |
| Minimum time between ads | Minimum time between 2 displayed ads in miliseconds | [Int] |
3.2 GameArter object Events
| Category | Event | Description |
|---|---|---|
| ADS | On pause game | Is true, when an ad is loaded - Need to mute/pause game |
| On Resume game | Is true, when an ad is completed - Need to unmute / unpause game | |
| Is active ad | Is true, when an ad is being displayed | |
| SDK | On SDK loaded | Is true once GameArter SDK is loaded and all GameArter features available |
| On cutscene completed | Is true when launched cutscene was closed | |
| On Possible game exit | It's called when SDK recognizes risk of escaping the game (e.g. closing page tab). This may be last opportunity to save game porgress. (In progress) | |
| USER | Is logged | Is true, when a user is logged in |
| PWA | Is PWA installation enabled | True, when installation is enabled (button for installation can be displayed). Use for quick check. |
| On PWA installation enabled | Called on PWA installation state change. True, if enabled. (= button for installation can be visible) | |
| On PWA installation success | Called, when the game was succesfully installed to user's device. |
3.3 GameArter object Actions
| Category | Action | Attributes | Description |
|---|---|---|---|
| ADS | Call Ad | - | Request an ad. |
| PWA | Request install as app | - | Install game as app. |
| Event | Post To Leaderboard | eventStringId (defined event name), achievedValue (achieved absolute value of the event) | Sets value for the event and posts it to leaderboard |
| Open Leaderboard | - | Opens leaderboard UI | |
| Set Event value | eventStringId (defined event name), achievedValue (achieved absolute value of the event) | Sets value of an event | |
| Save Events | - | Saves event values either on server or to a device (driven by user authentization) | |
| SDK | AnalyticsEvent | Values - action, category, label, value. ? | Post data to analytics. |
| Redirect | Target url. | Opens new tab. Redirect is tracked and displayed in panel. | |
| Display Cutscene | Cutscene index | Displays cutscene of selected index. | |
| Switch fullscreen | - | Switches between fullscreen / normal window. |
3.4 GameArter object Expressions
| Category | Action | Description |
|---|---|---|
| TECH | BrowserName | Returns browser name. List of Browsers |
| IndividualGameMode | Returns game mode set for current domain. | |
| USER | UserCountry | Returns user country code. List of countries |
| UserLang | Returns user language code. List of languages | |
| UserNick | Returns User nick | |
| UserRankName | Returns user rank name |
Closer explanation
-
Individual Game Mode
There's a possibility you require to run the game in individual game mode on certain website or e.g. for testing. By using individual game mode features, you can set individual mode the game will run in for every website the game is published on. SDK will return you after its initialization number of mode which you will assign to a certain website. Then, you can simply set data with which the game should run according the mode number.
-
Browser name
WebGL games have often different performance in various browsers. With knowledge of a browser a game is running in, there is a possibility for optimization of disabling features for certain browsers. E.g. car destructions for Chrome.
4 Examples
4.1 Sdk Initialization
Requests to GameArter SDK may be caled only after SDK initialization.

4.2 Get user info
Asking for nick-names is very annoying. Instead, nickname should be took from user's profile in GameArter. Similar with language, country and so on. Users should not be requested for any data they already provide. Here's example of available expressions for getting user's nickname, country and language.

4.3 Ads
Available ad types
- Fullscreen midroll ads (= Interstitial ads)
- Rewarded ads (= Fullscreen ads with a reward for watching)
Ad types can be combined in a game (One game can use both types of ads)
Fullscreen ad
Ad rules
- Call ads only in suitable places. Ads cannot affect best user experience (UX) from playing games
- Call ads in any suitable place for ad
- Game sounds MUST be muted during an ad
- Any exhortation or rewards for interacting with ads is prohibited
What is happening after an ad call:
- ad request is received in GameArter Ads manager.
- GameArter Ads manager checks availability of ads and processes ad-frequency-check.
- Ad state is returned by callback function.
Callback states
- loaded = (OnPauseGame) → Midroll ad has been loaded. Game sounts must be muted
- success = (OnResumeGame) Midroll ad has been succesfully completed. unmute sounds
Example implementation:

An alternative implementation through script code
function callInter(runtime){
	GSDK.I.CallAd("midroll",function(adState){
		switch(adState){
			case "loaded":
				// mute game
				runtime.globalVars.isSilent=1; // example through global variable
			break;
			case "completed":
				// unmute game
				if(runtime.globalVars.SoundDisable==1){
					runtime.globalVars.isSilent=1;
				}else{
					runtime.globalVars.isSilent=0;
				}
			break;
			case "ignored":
				// do nothing (it's beacuse the minimum time since the last advertisement has not been reached)
			break;
		}
	});
}
Rewarded ad
Availability of a rewarded ad is individual based on user's behaviour. Display button / option to launch rewarded ad only if the rewarded ad is available.
Callback states
- loaded = (OnPauseGame) → Rewarded ad has been loaded. Game sounts must be muted
- success = (OnRewardedAdSuccess) Rewarded ad has been succesfully completed. Release reward + unmute sounds
- failed = (OnRewardedAdFailed) something went wrong - user canceled the ad unmute sounds without reward
Button / UI for requesting rewarded ad must be visible only if rewarded ad is available (condition "Is Rewarded ad Available")
Example implementation:

Alternative implementation through script code
Note: We are dealing with an issue in the Construct v350 where an event associated with ad callback state OnPauseGame and OnResumeGame is not being triggered. This is an alternative solution that works for muting and unmuting game sounds during ads.
function callReward(runtime){
	var sound= runtime.globalVars.isSilent;
	// On rewarded ad request from user (e.g. pressing rewarded ad button)
	GSDK.I.CallAd("rewarded",function(adState){
		switch(adState){
			case "loaded":
				// mute game
				runtime.globalVars.isSilent=1; // example through global variable
				break;
			case "completed":
				// release reward
				// unmute game
				if(runtime.globalVars.SoundDisable==1){
					runtime.globalVars.isSilent=1;
				}else{
					runtime.globalVars.isSilent=0;
				}
				break;
			case "failed":
				// unmute game
				if(runtime.globalVars.SoundDisable==1){
					runtime.globalVars.isSilent=1;
				}else{
					runtime.globalVars.isSilent=0;
				}
				break;
		}
	});
}
4.4 Smart Events (Leaderboards, Achievements)
Simple implementation of Leaderboards and Achievements - All logic is defined on server side (placed in point 1.3 - Services configuration). On game side, there is onlz need to send up to date event values to GameArter SDK.
4.4.1 Achievements
Update value of an event during every change. (if current value is worse than previously achieved (during any game session), the zpdate will be ignored). In a case that the value will reach value of assigned achievement, the achievement will be released automatically. If there is active leaderboard for the event, the value on leaderboard will be automatically updated in certain time frequency (e.g. every 2 minutes - the time is driven by server)

Open Achievements UI on pressing of ingame button:

4.4.2 Leaderboard
Post current value to leaderboard (if there is already higher value in leaderboard, the post will be ignored).

Open Leaderboards UI on pressing of ingame button:

If you need to save values set in events manually in certain time, it's possible via action "Save Events".
4.5 Analytics
You can use any tool for tracking you want. Do not you know any? Here's example of few of them.
By default, GameArter has implemented and supports Google Analytics for websites with a bridge of caching game-side data events. All you need to do to activate it, is to insert your own Google Analytics tracking id to "Basic settings" tab of your project. This analytics tracks all gameplayer-based data as players, source of visits, time of playing and so on. These data can be extended by data in a form of events sent from a game, see Google analytics guide page. Some basic events as scene change and so on can be send to analytics automatically on basis of analytics configuration.

For more info related analytics events, see Google Analytics Events documentation.
4.6 Fullscreen
Because of other services around a game, fullscreen mode must be called over GameArterSDK. Attach following call to fullscreen button in your game (if your game has such button). If a game is already in fullscreen mode, fullscreen is cancelled by the call.

4.7 Redirects
-
Tracking redirects
With our solution you will know about every made redirect. - From what logo, on what website, and how oftenly is being used.

4.8 Cutscenes module
Every game contains many data-weight cutscenes, stories and animations which are displayed calmly only one time for the whole game. GSDK helps to reduce game filesizes by providing a story module — an option for downloading these stories from external storage only in a time when it’s required. Dynamic loading of game stories might be done via asset bundles or this SDK feature when the story is displayed in gameplayer above the game (like an ad).
-
1) Calling browser stories
Be sure that animation of such number is available for your game.
-
2) Callback functions
There is a callback state - "not found","loaded", progress states and "completed".

- 3) Setting / switching of stories
Is being made in "More" section of configuration of the project

4.9 Game as App
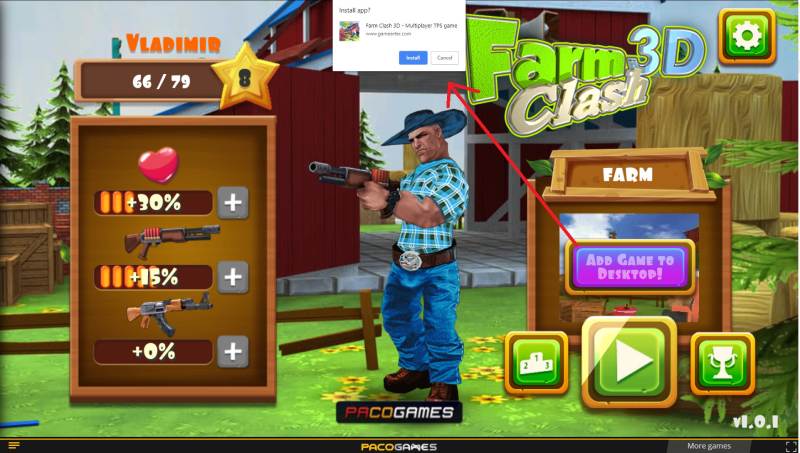
GameArter SDK allows to installation of web games as Web Apps to user's device. Installation is possible to PC as well as mobile device. This feature is available for games running directly at GameArter (not within an iframe).
Implementation
- NOTE: this feature is functional after submiting requests for publishing in GameArter.
- Icon of web app (displayed at user's screen of desktop / mobile) must be in .png format and in 2 dimensions - 192x192 & 512x512px. Name them "favicon-192.png" and "favicon-512.png" and attach to folder "_pwa". Upload this folder with other project files in "Files upload" section at GameArter panel.

NOTE: Button "Install game as app" must be hidden in default.
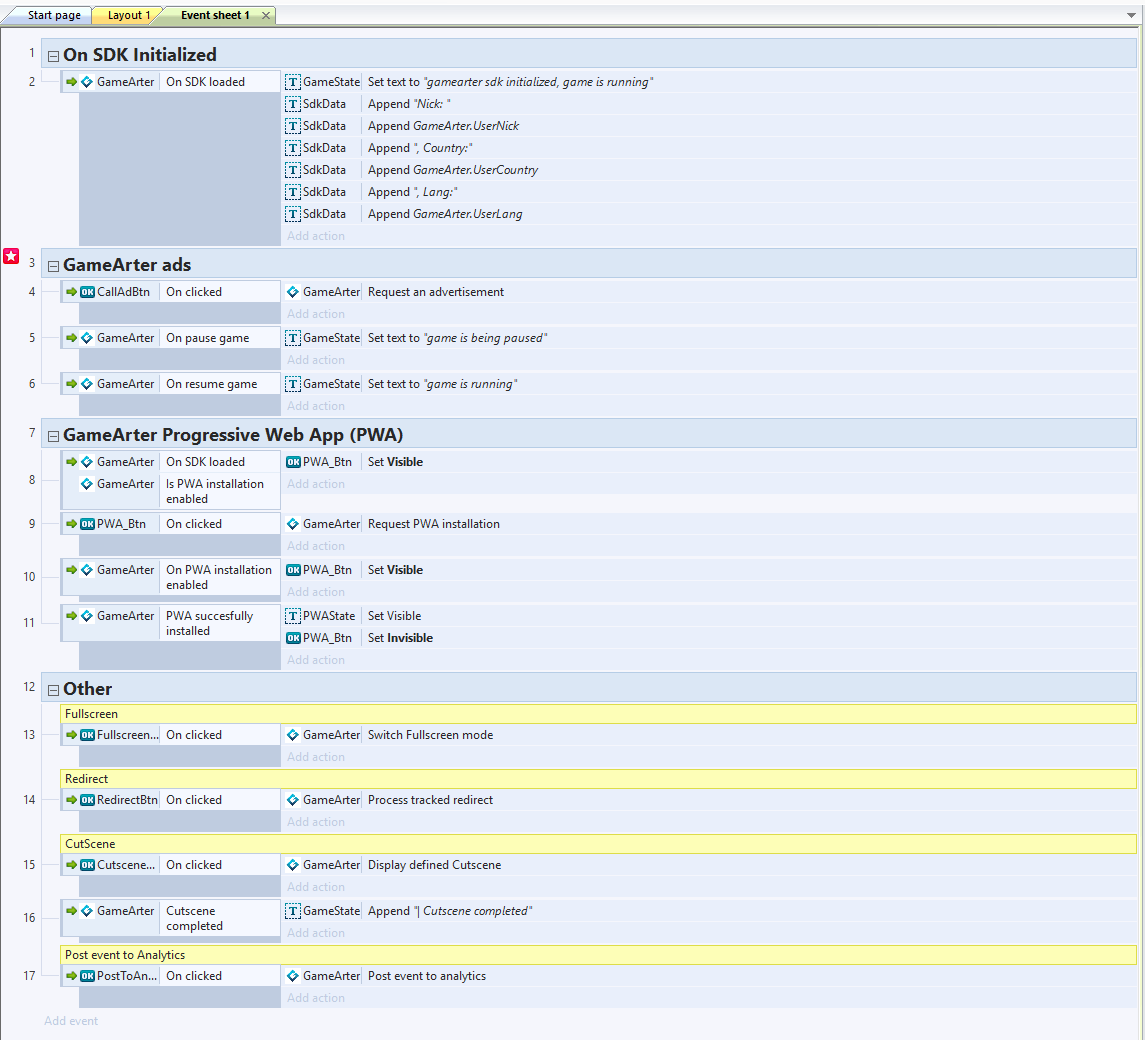
4.10 Full event sheet example
5. Testing
Start your game and verify tha all work as expected.
6. Upload to GameArter
6.1. Space for uploading files
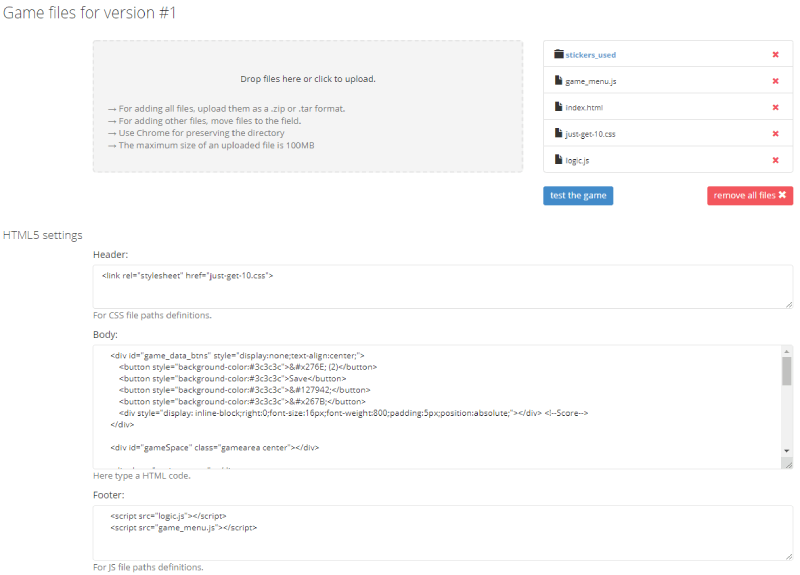
Game files must be uploated to GameArter via "files upload" section (button available in project panel). Every project version has own place for its game files.
6.2. Working with files structure
Mechanism for uploading files is build above Dropzone Open Source library.
Uploading files may be done by dropping files in your PC and moving them to DropZone area in GameArter
If your browser does not allow simple move & drop files mechanism, eventually the upload does not work as expected (e.g. inner folders are ignored), there is still possible to upload complete files inserted in .zip file.
New uploaded files automatically replaces files of the same filename. Cache is being cleared automatically during every file load.
Test the game button is available only if you are in a folder containing file index.html file (must be uploaded)
There is no possible to insert external links to body section. Load 3rd party links and libraries dynamically, if needed.
6.3. Creating universal index.html file
GameArter uses own-created GamePlayers designed purely for targeted platforms (a game runs in different gameplayer on every platform). For simple multi-player management, "files upload" section contain three textarea elements. Top area is designed for placing styles, middle area for placing game body elements, and the bottom for script elements. Once these text areas are filled, and this change saved, GameArter's gameplayers are created automatically on basis of data filled in text areas for style, body and script elements.
6.4. Setting GamePlayer
In a tab GamePlayer you can customize gameplayer. You can fill there game description, controls, links to social sites and so on.
7. Game releases
Managed by "Publication" section of a project.
7.1 Piracy protection
Before uploading your game to GameArter platform and processing release, be sure your intelectual property in a form of written game is being protected.
Currently, GameArter works on automatical obfuscation of uploaded source codes, meanwhile till this will be processed automatically you can do it for free yourself online.
Source code Obfuscation is good protection from stealing game code.
7.2 First release
Once the game is ready to release, you can get a public link for free spreading in the "Publish" section of the project after pressing "Publish now button". In this case, game is automatically fully set and you can start share the game with players. In one working day since release, GameARter also will make additional check of the game and its functionality. Once the game is checked, you will be informed about result on Slack or email. If all is ok, the game will be sent to hundreds of webmasters in the system. Next day after release, the game will be displayed in reports sections of GameArter dashboard.
Important note: Once you press publish now button, the game passess from "testnet" to "release" state. In a case that your game is connected with GRT currency, any updates of events / items / packages will be visible in the game after confirmation from a side of administrators. This is a protection from manipulation with prices and affecting value of GRT token. Therefore be sure you are requesting release state when you are sure you will not update your released version of game. For testing next updates before release, you can use testnets where you can still edit all the items without any limitation.
7.3 Game updates
Game updates are fully managed by developers via Publication tab in project environment. (Project section at GameArter). After pressing "Publish now" button, previous game version is instantly replaced for a new game version automatically. By this action, you take full responsibility for the update so be sure the new version works well.
GameArter keeps 2 last game versions for option to return back in a case of need.
8. Troubleshooting
List of known issues you may to face to. If you find another one, report it, please.
7.1 Only black screen (in editor) after clicking "click preview".
Check "project properties > advanced > Use Worker". Select option "No" may help.
7.2 Black screen after uploading to gamearter.
Check, that the canvas element of the game is displayed in visible screen area. If it is not, you can move it to visible area by adding following code into "header" textarea at the bottom in uploading game files project page.
<style>canvas {position:absolute;top:0;left:0}</style>